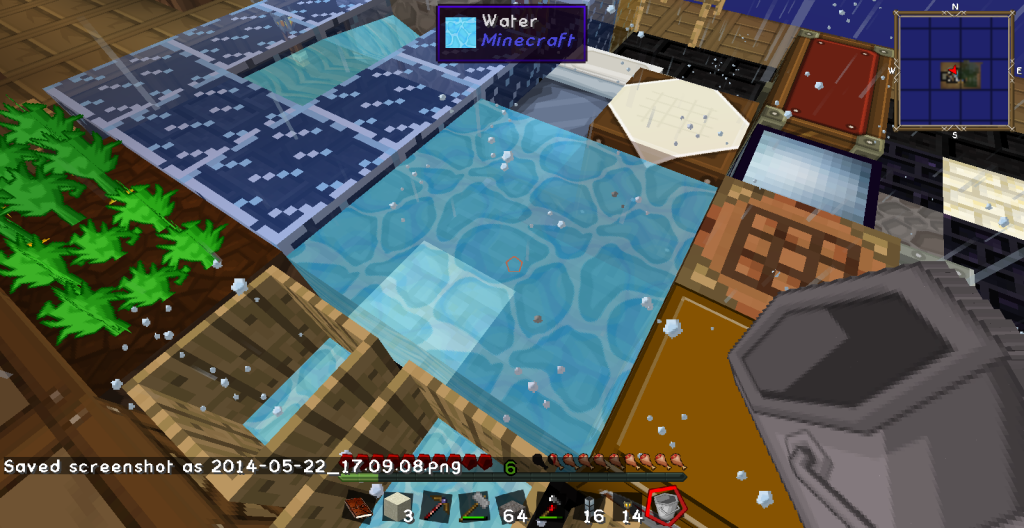
yeah, so I'm still waiting to see the verdict of what happens to my laptop....I hear I'm supposed to wait for 24 hours at least. At least it was only water....... sighs
で?今日の報告ですが。水とパソコンって合いません。ハイ。24時間程待ての状態です。夕べから待っています。日記はあのパソコンじゃなくても出来ますがこのパソでは・・・・・・鈍いですので待ちます。イライラ。ハイ。
Saturday, May 31, 2014
Thursday, May 29, 2014
What I need....
is someone to play with me so they can keep me on track, cuz darn it, I just keep getting distracted. It's upsetting how easily I stray off the beaten path. Like that brownie just gotta wink at me and I'm already off my low carb diet. But then again, who could resist a winking brownie?
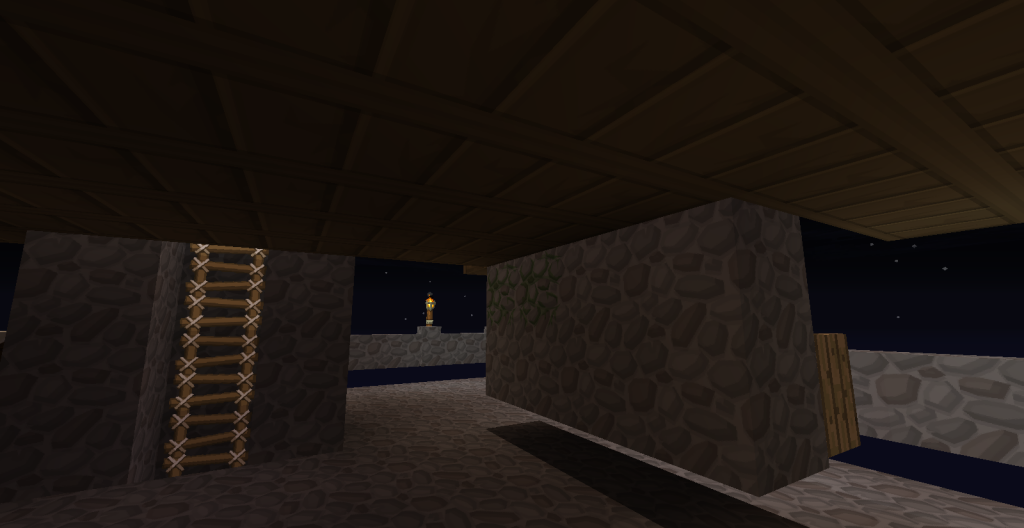
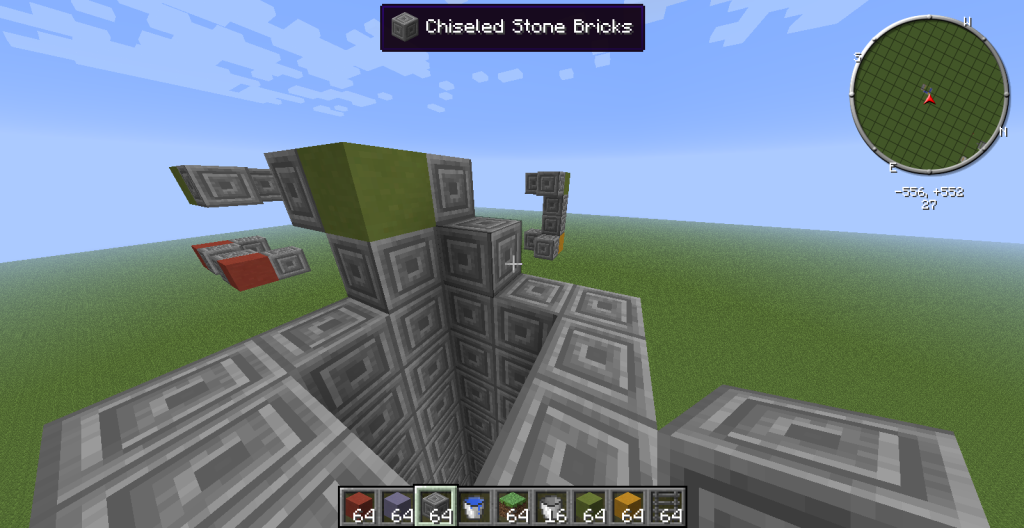
So, here I thought I'd start doing stuff to get at least a tree farm up and running. Where am I now? On the 2nd floor under the base, trying to move inventory around. Because my chest inventories on the top floor is mostly all full, mostly all over the place, and my personal inventory is so full I can only sift one gravel before I need to shift inventory all over again. It's enough to drive a person crazy.
Yep, so how do I start off making more space? Make more chests, of course. Specialized chest from Jabba. I just love these things. I can see where I store all mine things without looking into the chest all the time - cuz I used to spend a lot of times looking in a lot of chest before this. Now all I have to do is look at the chest and I can tell what is in it. Without any picture frames even.
Now, that I've started this though I do see how I'll probably be using this 2nd floor space eventually. Because I made the room with no idea what was going to happen there. And I might just end up working on this first so I can make easier progress later. Besides storing all the stuff that I get from sifting, I'll probably store all my autonomous activators here to work on sifting. Maybe one room for each type of sifting. Though I mostly tend to sift gravel, I do like sand for glass and dust for glowstone and redstone. Since I don't have any other alternatives to these resources yet, I'll probably set up a hammer center to make sand and dust too. So 1 room for a sand maker, 1 room for a dust maker, 1 room for a gravel sifter and 1 room for the dust sifter. At least for now.
After that? More sifting and pounding for a while. Stay tooned?
* was trying to get this posted yesterday but kept crashing somehow when I tried posting some pics with this. And my smeltery was taking a dive too. Had a lot of ores in it and when I looked at the panel........nothing. When I went to pour out a block or ingot, it'd come out but look at the panel.........nothing. Kept on pouring out all my glass from in there and finally when I looked in my panel.....it was back to normal. Probably I just overloaded the poor thing. Hopefully, that's what it was.......
と言うか真っ直ぐ進めない自分です。木の栽培場に取り掛かろうとするもチェストのなか身具合が気になって、気になって居ても立っても入られなくなって当等整備管理に取り組みました。こうして又農園畑が遠ざかるのです。
兎に角チェストが所狭しにギュウギュウ詰めで何がどこにあるのかも一々チェストを開け閉め状態です。なので又Jabbaチェストの在庫を作っている段階です。これならすっきりしますし、見た目も綺麗ですし、何より沢山のモノが確保できます。木をやばい位使いまくりますが。木の栽培の後にすれば楽なのに、敢えて貧乏の道を進める私です。ハイ。
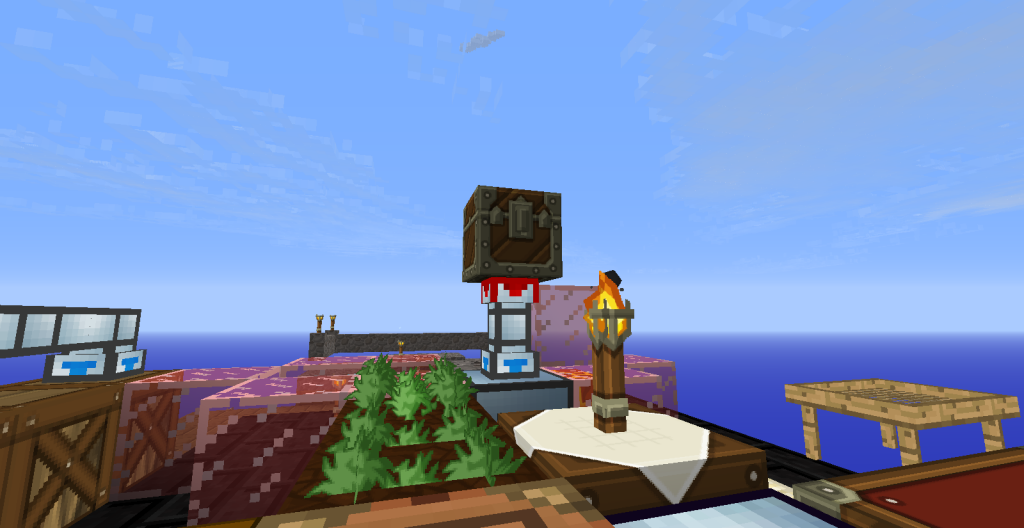
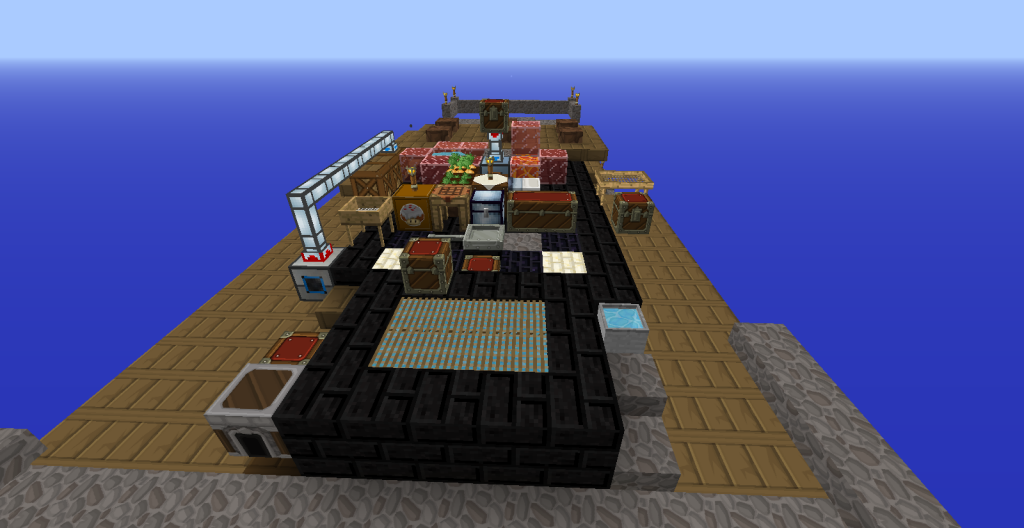
一応これで二階の地下室の使い方もきまったので悪いことばかりではありません。収納部屋兼お宝発掘センタになる予定です。実際はこんな具合になっています。収納サイドです。
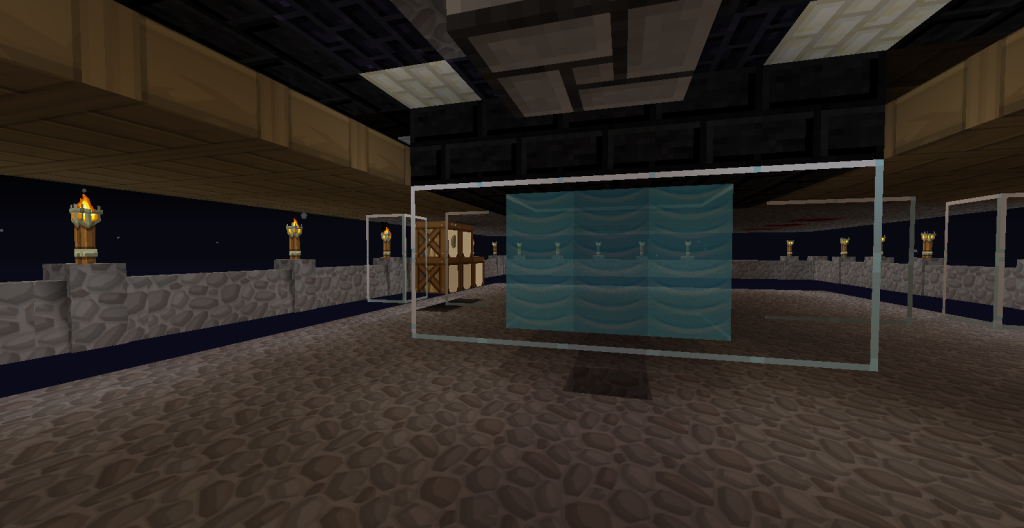
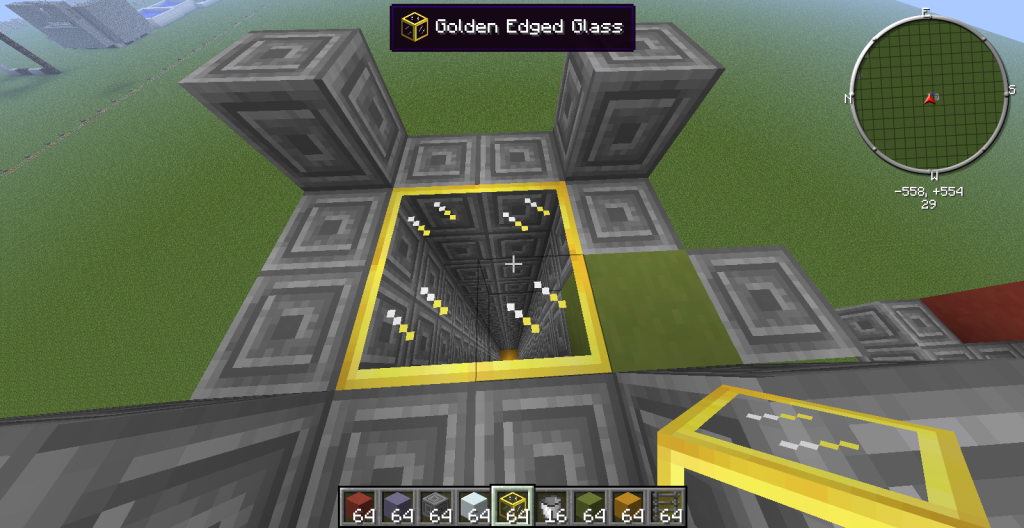
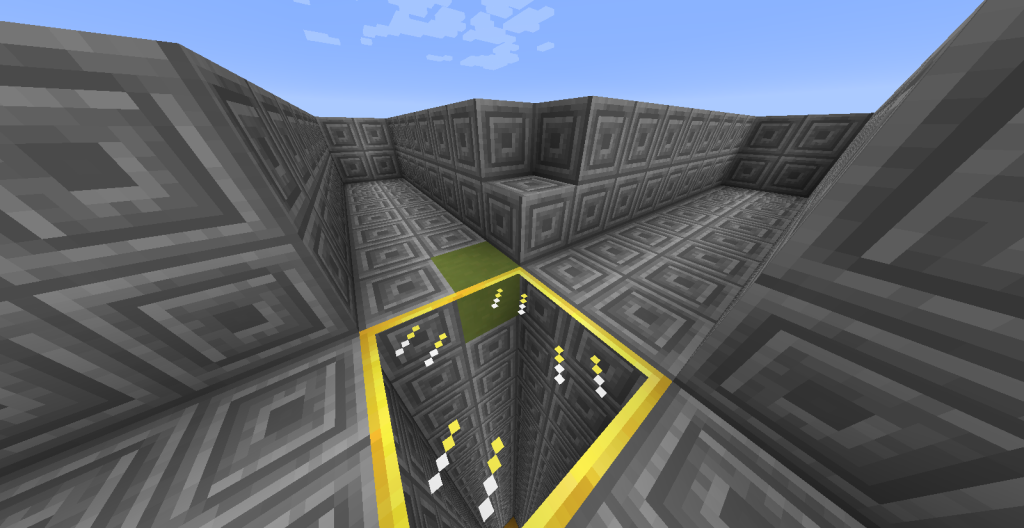
でもって、序に御苔場も作って、その向側に即席のお宝発掘センタが立ちました。これは又明日にでも話題を持越しです。明日の話題決まって楽です。ハイ。
後、気になりますか?部屋のド真ん中にガラス張りの水族館?気になりますよね?気にしてください。何れイカ墨釣り場になるかもです。未だ此処では駄目かもしれませんが最下位迄下げて行けばキッと。
So, here I thought I'd start doing stuff to get at least a tree farm up and running. Where am I now? On the 2nd floor under the base, trying to move inventory around. Because my chest inventories on the top floor is mostly all full, mostly all over the place, and my personal inventory is so full I can only sift one gravel before I need to shift inventory all over again. It's enough to drive a person crazy.
Yep, so how do I start off making more space? Make more chests, of course. Specialized chest from Jabba. I just love these things. I can see where I store all mine things without looking into the chest all the time - cuz I used to spend a lot of times looking in a lot of chest before this. Now all I have to do is look at the chest and I can tell what is in it. Without any picture frames even.
Now, that I've started this though I do see how I'll probably be using this 2nd floor space eventually. Because I made the room with no idea what was going to happen there. And I might just end up working on this first so I can make easier progress later. Besides storing all the stuff that I get from sifting, I'll probably store all my autonomous activators here to work on sifting. Maybe one room for each type of sifting. Though I mostly tend to sift gravel, I do like sand for glass and dust for glowstone and redstone. Since I don't have any other alternatives to these resources yet, I'll probably set up a hammer center to make sand and dust too. So 1 room for a sand maker, 1 room for a dust maker, 1 room for a gravel sifter and 1 room for the dust sifter. At least for now.
After that? More sifting and pounding for a while. Stay tooned?
 |
| a moss gathering center - since I had the time. |
* was trying to get this posted yesterday but kept crashing somehow when I tried posting some pics with this. And my smeltery was taking a dive too. Had a lot of ores in it and when I looked at the panel........nothing. When I went to pour out a block or ingot, it'd come out but look at the panel.........nothing. Kept on pouring out all my glass from in there and finally when I looked in my panel.....it was back to normal. Probably I just overloaded the poor thing. Hopefully, that's what it was.......
ハ~人生は迷い道。
と言うか真っ直ぐ進めない自分です。木の栽培場に取り掛かろうとするもチェストのなか身具合が気になって、気になって居ても立っても入られなくなって当等整備管理に取り組みました。こうして又農園畑が遠ざかるのです。
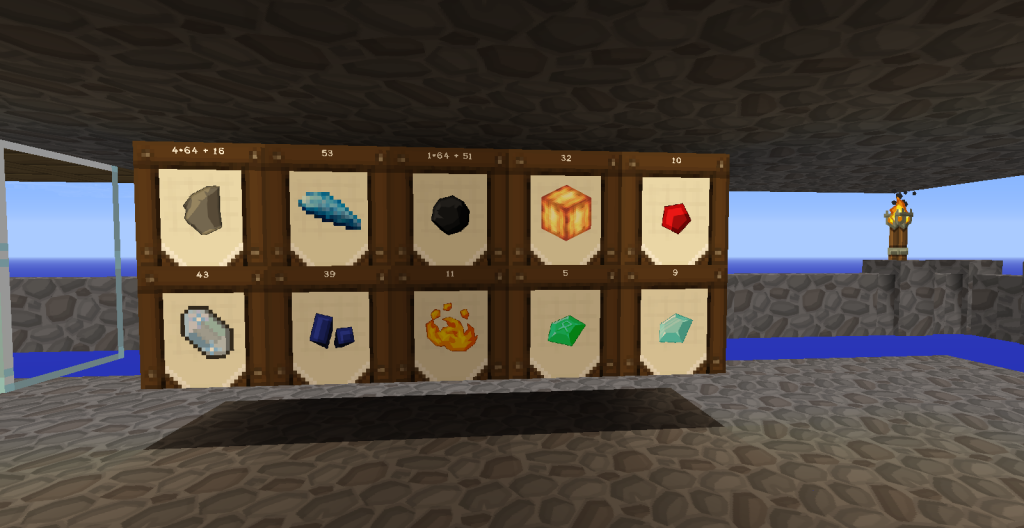 | |
| 向側にはインゴットとか |
一応これで二階の地下室の使い方もきまったので悪いことばかりではありません。収納部屋兼お宝発掘センタになる予定です。実際はこんな具合になっています。収納サイドです。
でもって、序に御苔場も作って、その向側に即席のお宝発掘センタが立ちました。これは又明日にでも話題を持越しです。明日の話題決まって楽です。ハイ。
後、気になりますか?部屋のド真ん中にガラス張りの水族館?気になりますよね?気にしてください。何れイカ墨釣り場になるかもです。未だ此処では駄目かもしれませんが最下位迄下げて行けばキッと。
 |
| 優美な感じがします。自分的に。 |
Tuesday, May 27, 2014
IT WAS THE LAG!
Yes, I'm going to blame my lack of progress all on the fact that I was lagging badly. Because I was lagging. Couldn't place anything in my chests, every time I was clicking on my mouse buttons from my inventory screen, the darn thing would throw away whatever I had in my hand. I still tried but it got really tiring to try to throw a way a bunch of stuff and try to pick them up in the right order so you'd end up with the item you wanted in your inventory slot. And it really had nothing to do with the fact that I spent my Memorial day weekend playing on Fiesta Online's tournament event instead. Yep.
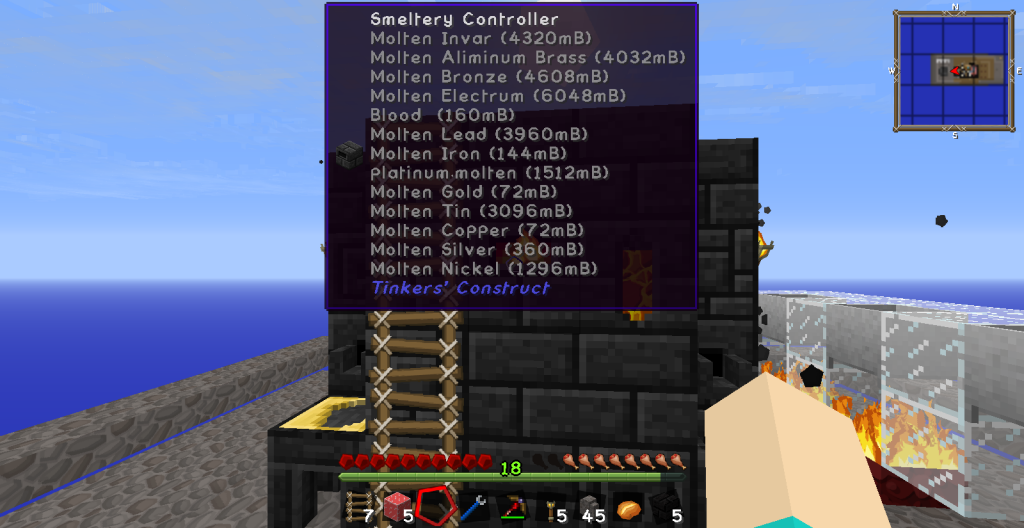
Anywayz, since I wasn't able to progress much on AS, I decided to do a look-back, as oppose to a look forward, so I can see what I forgot to mention as I was going along. For example, the smeltery. We did a brief overview of the smeltery on the last island because we wanted some ingots - and forgot that a furnace could smelt the ingots too. Well, here's another reason you want a smeltery.
You want a smeltery because you need invar ingots to make an Autonomous Activator! And you can't smelt your ores in a furnace to make invar ingots. At least, I don't think you can. But if you have a smeltery, you can make invar ingots by dumping in all your ores into the smeltery and it'll mix the ores up into other types of ores that you can't sift. Like the invar. Why do you have to dump all the ores in though? Because I have no idea what combinations of ores combine to make the invar, of course. Why else would I do that?
 |
| the melting pot with mystery meat included |
The other thing about the smeltery that I just discovered this weekend? It gives you some mysterious substances that no way could have come from an ore. It was a eye-opening discovery. Looked at my control panel and saw something that was not an ore. Can you see it? I mean, when I was making the thing over three blocks high, I did notice that the bottom pit area would show yellow cross marks with F7 on and I did think, hmmmmm~~~~. Never really expected it to amount to much though. Nice surprise I suppose? Now, if only I knew what to do about it?
 |
| I like heads sticking up |
 |
| small and crowded |
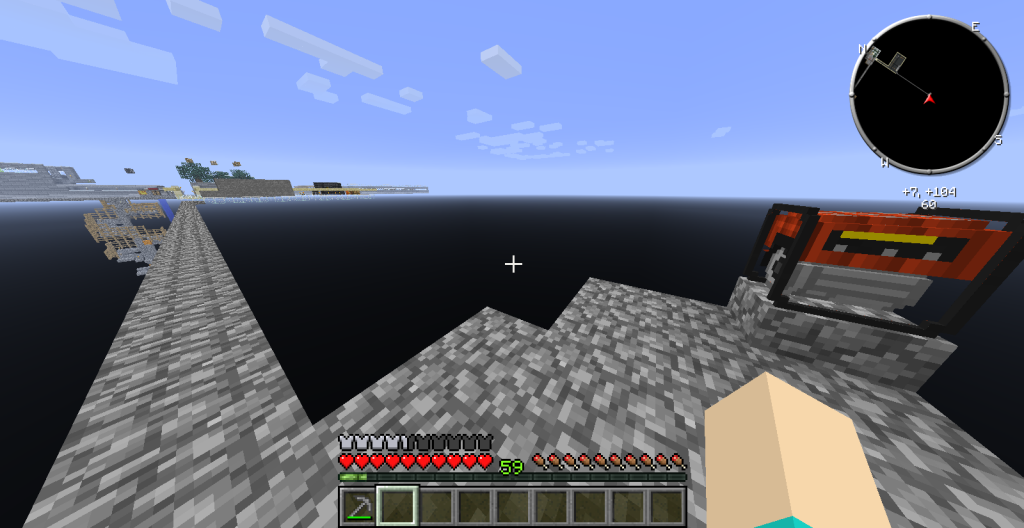
And the last time, I mentioned, I'm sure my ineptness at doing any sort of water scaffolding building. I normally either drown or fall out of the water. Before ever placing a block. Multiple times. So, on these modded skyblocks or skyblocks you play in later versions when redstone and iron is available to you, I normally shaft my way down. Here's how I do it.
 |
| your easy way down |
 |
| stone pull down repeat |
2) Next you place a piston above one of the cobble blocks and keep on pushing down more cobble until the piston stops. It stops at around 13 blocks. I think. You do the same for all 6 blocks. The piston is placed 2 blocks above so you can place another cobble below it and push it down.
 |
| looking up from below |
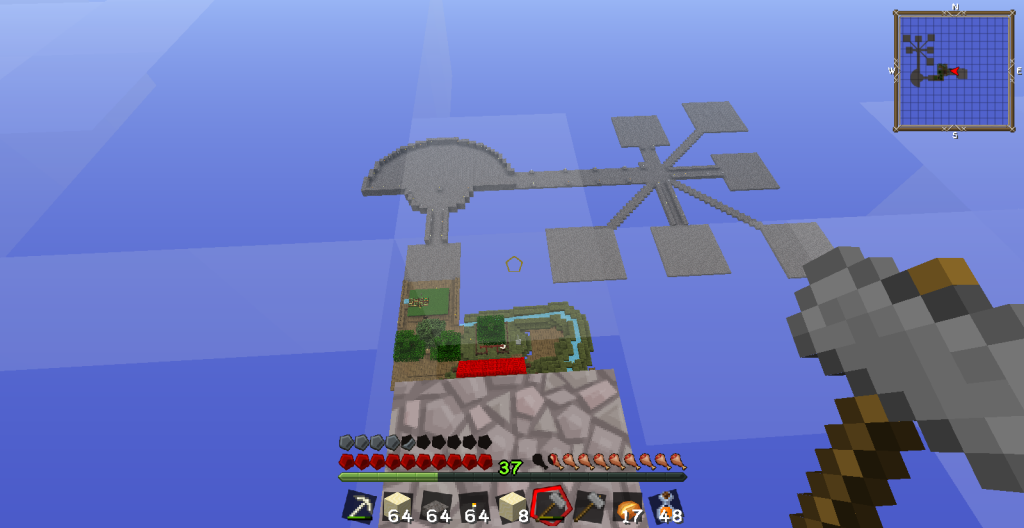
So, there you have it. A look back to reflect on some points I didn't get to cover before. And since last time our map was eaten by the Void, in the midst of farm city, I'm thinking maybe I'll go make a farming area off of the main platform for a simple tree farm and food farm. Nothing too ambitious like last time. And this time I'll have the TNT generator built next to the sludge room. Just gotta think of a way to make it safe to approach. Sound mufflers, piping, etc. And yes, it's going to be a tnt generator first - even without a mob tower. Because the WiseOnes have spoken and given me a bag of tnt as a reward. And I'd rather put it to use instead of having it hanging around - just in case.
で、今後の方針ですが前回寄り大きく寄り早く寄り楽にを目指したのですが出鼻を挫かれて寄り小さくややゆっくりと楽々ライフを目指すことにしました。大抵はその為にモブタワーなのですが敢えて寄り小さくを目指して先ず農園畑を目指すかもです。前回挫折したモノを今回完成させてから成功を糧にして行きたいと思います。なので、先ずは植林地を開拓します。と言うか今迄遣っていた木の栽培畑を上り下りの梯子シャフトに変身させたので早く何とかしないとヤバイかもです。
Memorial Dayの三日間の連休でした!
で、AS全然進みませんでした。ラグが酷かったんです。ハイ。ラグのせいです。だって、ですね?インベントリを開けてマウスをクリックすると手に持っているアイテム捨ててくれるんですよ。クリックする度に。チェストにモノを出し入れできないは、ほしいモノがインベントリに在ってもクリックすると捨ててくれて、手に持ちたければ拾っては投げての繰り返し。泣けます。ので、決して他のゲームに現を抜かしていた訳ではありません。ハイ。
で、ラグのせいで進めなかったので代わりに今迄素っ飛ばしていた重要要素が幾つか在った事にも気付きました。立ち止まって位置を確認するのも大事です。ハイ。ので、気付いたことにLet's Goです。
先ずはSmeltery工房です。前にも一寸触れましたが以前はインゴット欲しさに造っていた利点しか挙げませんでした。竈でインゴット造りに気付かず造った工房ですがもっと重要な点が在ったんです。Invarとその他鉱石造りの為でした。わすれ・・・・ えっと、ザルから取れる鉱石だけでは機械化できません。その他にも必要になる鉱石を生み出す方法として工房を使うという事でした。何故なら竈では鉱石は混ざりませんが工房に投げ込めば蕩けた鉱石(厭らしい響きですね?) が混ざり合って新しい鉱石を誕生させてくれます。なので、片っ端から鉱石を工房に投げ込めばその内Invarも生まれてくれます。どの鉱石が親元に生っているのかは分からなくても大丈夫です。皆放り込みましょう。他にも色々と産まれてくれます。らんk・・・・ゴホンゴホン・・・・皆、愛し愛されて生まれるのです。
後、工房ですが今回は前回より一寸だけ壁を高くしてみました。 すると、ビックリ。操作パネルを除いたら明らかに鉱石では無い物体が混ざっていました。血です。ビックリです。でも、ですね?今回壁を高くして行く時にF7キーで工房の中を覗いていたんですが暗いんです。黄色い線だらけです。で、アッと思うところも在ったりしました。若しや沸くかなとか。で、矢張り沸いたそうです。でもご対面は無いので嬉しい限りです。この血って何に使うのか未だ分かりませんがその内魔界の扉を開くかもなMODの為だったりするのかもですね?
後、瞑想してみたのは下への降り方ですかね?だって、ヘタなんです。水をつたって行くなんて神業持ち合わせていないんです。なので、無い脳を遣って考えたらピストンを使って掘り下げていけば良いという形になってしまうんです。他にも溶岩を垂らして水に後追いをして貰うって言う手もありますがこれでは所々モブ這え沸き場が出来たりするんです。危ないです。ピストンだと足場も作れるので場を広げるにも簡単にいくんです。降りるのも簡単上がるのも簡単。後必ずモブが沸かない床が出来ています。
上記1~3のようにSlabの上に丸石を置けばSlabが床に成るし、モブも沸かないし、堀下がる時明らかに隙間が丸石との間に見えるので数えないでも真下彫りでOK。後壁になっていた周りの丸石を退ければ6ブロックの床に成って其処から足場を広げるのが楽になったりします。又、下に下りたい時も同じ様に繰り返せば更に降りれる利点もあります。一番の利点はヘタレでも出来ること立証済みです。ハイ。
で、一番下まで彫るのも良いんですが途中に何層か建てていくのも良いです。これは色々とありまして、堀下がる途中で造っていくか(一番簡単かも?)、下から上に向けて天井を置くように敷いていくか(これも良いです下見ないだけに)、後登りながら梯子にしがみ付いて床を置いていくとか・・・・最後はいらん苦労をするので余り進めません。頭は生きれいる内に使いましょうです。ハイ。
で、今後の方針ですが前回寄り大きく寄り早く寄り楽にを目指したのですが出鼻を挫かれて寄り小さくややゆっくりと楽々ライフを目指すことにしました。大抵はその為にモブタワーなのですが敢えて寄り小さくを目指して先ず農園畑を目指すかもです。前回挫折したモノを今回完成させてから成功を糧にして行きたいと思います。なので、先ずは植林地を開拓します。と言うか今迄遣っていた木の栽培畑を上り下りの梯子シャフトに変身させたので早く何とかしないとヤバイかもです。
Friday, May 23, 2014
Yep, starting all over again......
but this time, I'm doing it on the flat map. Which, I have to say, is quite a different experience from the beautifully colorful island map I've been playing on so far. And I have to say, I HATE IT (when I started)! But on the other hand, I LOVE IT(now that I've progressed)!
Yes, a bit of a contradiction, I know. But that's me. I make no sense even to myself sometimes. But then again, there are a few reasons for each sentiment that come with this flat map. Especially after playing the other map. Almost a guilty feeling for liking this map as much as I do because the other map was so much more beautiful in a colorful way. Not that this map doesn't have its own beauty. It's a minimalist's dream. The old-style skyblock. But on to why I hate it and love it, maybe so I can rationalize (me and rational.....) my feelings and expectations for this map.
The reason I can't stand this map is because it's so SMALL. I mean, really, really small. Well, actually it is bigger than the original skyblock or even some of the other skyblock maps available. But after playing so long on the other island it feel so ....cramped. And the more stuff I get, trees, cobble, ores, the smaller it feels. I mean, I had to make my infinite water source using my bed as one of the walls o.o. I'm sure that once I start expanding the map, this feeling will lessen but this cramped space I live in reminds me so much of my apartment........At least, here I can expand the room eventually.
The other reason I'm not so fond of this map is that in the beginning it just seems harder to get food. The other map, at least in my case, was fairly generous in it's initial drops for apples and sapling. This map, on the other hand, hardly dropped me any apples and sapling when I began. It was so frustrating. I was even resorting to fishing in the small pond to keep from staving. Good thing I had that drying rack?
However, after getting over my initial dislike for the map - probably because I abruptly had my adventure disturbed on the other map more than anything - the island has begun to grow on me - literally. It's already expanded to include a manual tree farm, smeltery area and 2 floors going down into the basement area. And with more space available, it begins to foster warmer feelings in me <3. And my infinite water source turned into a mini-potato
farm so I feel even better with my starvation fears slowly dissipating.
And because this island map is so stark and barren compared to the other map, I feel even better about building my tofu-block structures. Because that other island was really, really pretty. It seemed almost a shame to be building all those ugly cobble monuments I was making all over the place. It just didn't fit in with all that nice and colorful map. Here though, I feel less intimidated (yes, it felt so bad every time I built those massive eyesores) about being ugly. Not that this island isn't nice - I mean those glowstone bricks!
Not really sure what my plans will be for the map now, maybe I'll just concentrate on doing more of my quests this time. I am planning to make my mob farm again. Though maybe a little differently. Not really sure it will even work. But if it does, it might be easier to work on - maybe. It's still all in the head so not necessarily will it translate to an actual workable structure in reality. And I'm working on making all those automation machines again. I've already made my IE partner. And I'm planning to make my AA soon - so I can get out of gravel work. Not sure I'm going to do a 3 pulverizer system like last time though. And still swaying between the auto farm annex or mob tower annex. Which to do first..................
又、始まりました。イヤ、前回も前々回もその更なる前も自分で終了して遣り直していますが今回のは不意打ちの再スタートだったのでちょっと凹んでいました。 でもやり直しなので進む進む。Practice makes perfectですよ?パーフェクトじゃないですが。
兎に角、今回は折角新しくスタートしますので出来立てマップ(だって家とか既に出来ているから)ではなくマッサラマップ所謂フラット・マップで挑戦中です。フラットつまり平地マップだけあって何も無いです。グロー・ストーン煉瓦は綺麗でしたが。後、池も多少は釣り易かったかな(林檎の落ち具合は悪くなった様な気も)?
でも、小さいんです。初代スカイ・ブロックや他のスカイ・ブロックに比べるとそうでもないんですが。今迄のマップに比べると小さいし、狭いし、モノを置く処が直ぐに無くなるんです。でも、この状況って自分のアパートみたいで嫌ですね?急いで島拡大に手を廻さねばなのです。急ぐのって嫌いなんです。ゆっくり、ノンビリ、マッタリがいいんです。 でもそうも逝っていられないです。ハイ。
なので、IEくんを早速作って、地下室二段階作って、工房場建てました。四回目なので早いです。でも未だ引越しは無し。だって何処に何を置きたいか決まらないんです。モブ・タワーも欲しいし、自動農園も欲しい。でも今回はクエストもこなして逝きたいし。なので遣ること一杯です。何から手を付けて逝きたいか決まりません。お負けに折角のMOD入りなのでちょっと水式タワーじゃないモブ・タワーも良いかな~と思ったりもしています。でも計画は未遂。未だ脳内グルグルです。ハイ。
ちょっとチラ見すると最終的にはピストンで落としてconveyor belt自動運搬ベルトで運んでgrinder又は串刺しにして出来上がり感じな?でもって、落とすの高くなくても良いかもが造る理由?けどピストン雲念だとメンド・・・・難しいかな的な感じな?
Yes, a bit of a contradiction, I know. But that's me. I make no sense even to myself sometimes. But then again, there are a few reasons for each sentiment that come with this flat map. Especially after playing the other map. Almost a guilty feeling for liking this map as much as I do because the other map was so much more beautiful in a colorful way. Not that this map doesn't have its own beauty. It's a minimalist's dream. The old-style skyblock. But on to why I hate it and love it, maybe so I can rationalize (me and rational.....) my feelings and expectations for this map.
The reason I can't stand this map is because it's so SMALL. I mean, really, really small. Well, actually it is bigger than the original skyblock or even some of the other skyblock maps available. But after playing so long on the other island it feel so ....cramped. And the more stuff I get, trees, cobble, ores, the smaller it feels. I mean, I had to make my infinite water source using my bed as one of the walls o.o. I'm sure that once I start expanding the map, this feeling will lessen but this cramped space I live in reminds me so much of my apartment........At least, here I can expand the room eventually.
 |
| before fire there was the rack |
However, after getting over my initial dislike for the map - probably because I abruptly had my adventure disturbed on the other map more than anything - the island has begun to grow on me - literally. It's already expanded to include a manual tree farm, smeltery area and 2 floors going down into the basement area. And with more space available, it begins to foster warmer feelings in me <3. And my infinite water source turned into a mini-potato
 |
| limited space = multitasking |
And because this island map is so stark and barren compared to the other map, I feel even better about building my tofu-block structures. Because that other island was really, really pretty. It seemed almost a shame to be building all those ugly cobble monuments I was making all over the place. It just didn't fit in with all that nice and colorful map. Here though, I feel less intimidated (yes, it felt so bad every time I built those massive eyesores) about being ugly. Not that this island isn't nice - I mean those glowstone bricks!
Not really sure what my plans will be for the map now, maybe I'll just concentrate on doing more of my quests this time. I am planning to make my mob farm again. Though maybe a little differently. Not really sure it will even work. But if it does, it might be easier to work on - maybe. It's still all in the head so not necessarily will it translate to an actual workable structure in reality. And I'm working on making all those automation machines again. I've already made my IE partner. And I'm planning to make my AA soon - so I can get out of gravel work. Not sure I'm going to do a 3 pulverizer system like last time though. And still swaying between the auto farm annex or mob tower annex. Which to do first..................
ハイ。又です。
又、始まりました。イヤ、前回も前々回もその更なる前も自分で終了して遣り直していますが今回のは不意打ちの再スタートだったのでちょっと凹んでいました。 でもやり直しなので進む進む。Practice makes perfectですよ?パーフェクトじゃないですが。
兎に角、今回は折角新しくスタートしますので出来立てマップ(だって家とか既に出来ているから)ではなくマッサラマップ所謂フラット・マップで挑戦中です。フラットつまり平地マップだけあって何も無いです。グロー・ストーン煉瓦は綺麗でしたが。後、池も多少は釣り易かったかな(林檎の落ち具合は悪くなった様な気も)?
 |
| チェストだけが収納方じゃない。一石二鳥。 |
なので、IEくんを早速作って、地下室二段階作って、工房場建てました。四回目なので早いです。でも未だ引越しは無し。だって何処に何を置きたいか決まらないんです。モブ・タワーも欲しいし、自動農園も欲しい。でも今回はクエストもこなして逝きたいし。なので遣ること一杯です。何から手を付けて逝きたいか決まりません。お負けに折角のMOD入りなのでちょっと水式タワーじゃないモブ・タワーも良いかな~と思ったりもしています。でも計画は未遂。未だ脳内グルグルです。ハイ。
ちょっとチラ見すると最終的にはピストンで落としてconveyor belt自動運搬ベルトで運んでgrinder又は串刺しにして出来上がり感じな?でもって、落とすの高くなくても良いかもが造る理由?けどピストン雲念だとメンド・・・・難しいかな的な感じな?
Tuesday, May 20, 2014
...........It disappeared.....................
A big portion of my farm to be.......gone. I knew I shouldn't have updated. I was just too fast to push that button. I should have know better..........
Lucky thing I have this blog so I know what I was suppose to do next time. Probably trying a different map this time. Probably the flat map this time :) Never give up!
Lucky thing I have this blog so I know what I was suppose to do next time. Probably trying a different map this time. Probably the flat map this time :) Never give up!
世界が消えました
と言う訳で、又もや一から遣り直しです。一からです。アップデート良くなかったんでしょうか?良いんです。その為のブログです。一から読み直して今度は平地マップに挑戦です。諦めません。
Monday, May 19, 2014
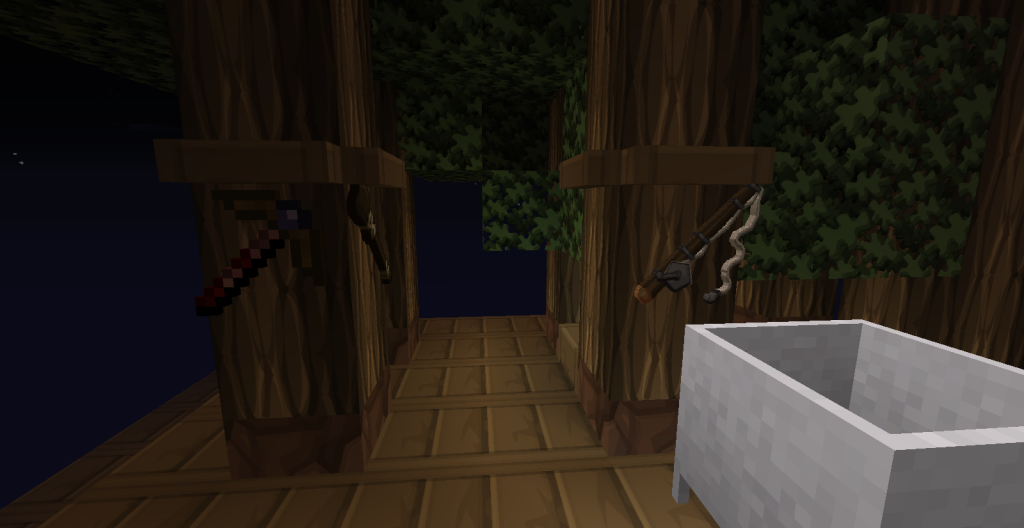
My plumbing sucks
In real life and in AS. Really, it does. The water in my tub just refuses to go down for minutes on end. My pipes in AS have a similar problem currently and refuses to take anything out of the mob drop chest and deposit them into their appropriate Jabba chest. IRL I know I'm not at fault. I assume that in AS, I am most likely at fault. But either way, on with the build!
Yes, today we finally work our way around to building our fool proof mob tower - not as in - it has super efficiency or any thing like that. NO, it's like - at least this will work even if you're a total fail at anything technical and complicated. Because it's fool proof. So even if you have difficulty counting to 8 sometimes it'll work for you. Understood?
And so we begin by laying out some cobble - on the ground. And if I just explain everything it'll get really confusing so there will be quite a few pictures. And all of this was done in a creative flat world because really, I can't be bothered to take photos when I'm actually doing this in AS - much too scare.....at least in creative, you can fly. And if you can fly, the heights don't seem as bad........Anyway.
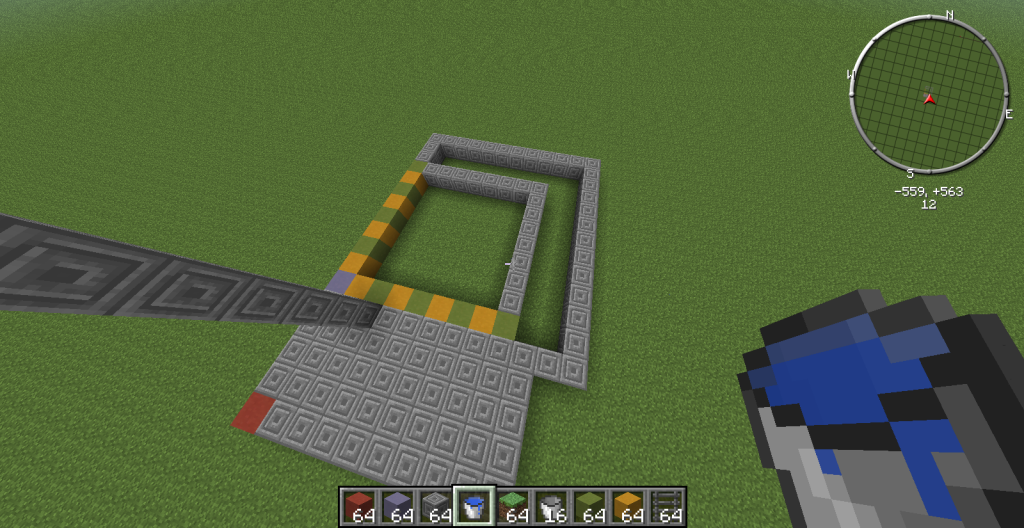
First, we layout our safe house outline. Red is our starting block. Green is where the ladder will be. I tend to make it at least 5 wide so I can make an infinite water source upstairs later on.
Next we pillar up. The four corners and ladder block in red. I normally build this around 24~26 blocks up for the first floor. If I weren't in creative I'd have the water still in place at the bottom, just in case. The pillars are not seen because after I pillared up and placed the side gray blocks, I placed the red block from the bottom as I was picking my way downwards. Only the ladder pillar would be there to climb up. You can now go up the ladder and build out your safe house by filling in the blocks to each corner. No counting needed because you did it down on the ground.
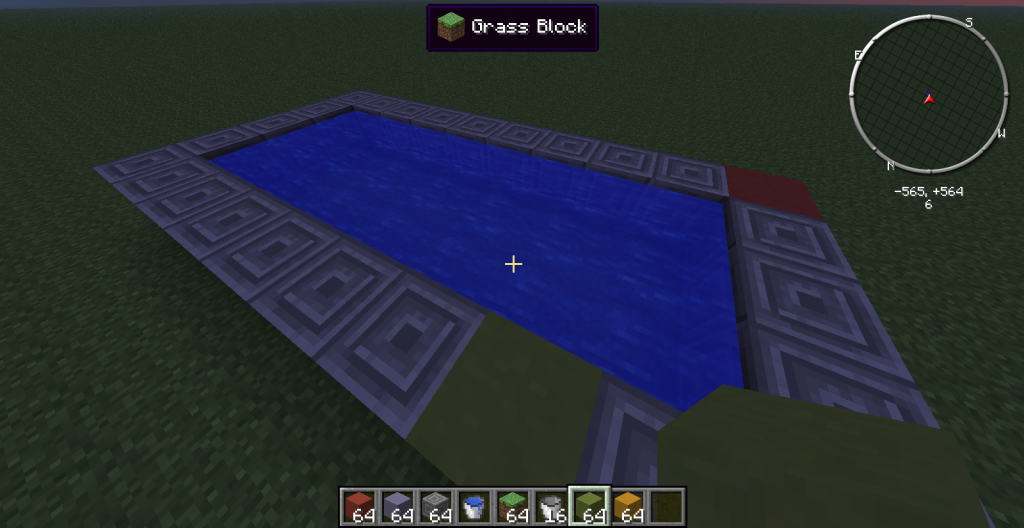
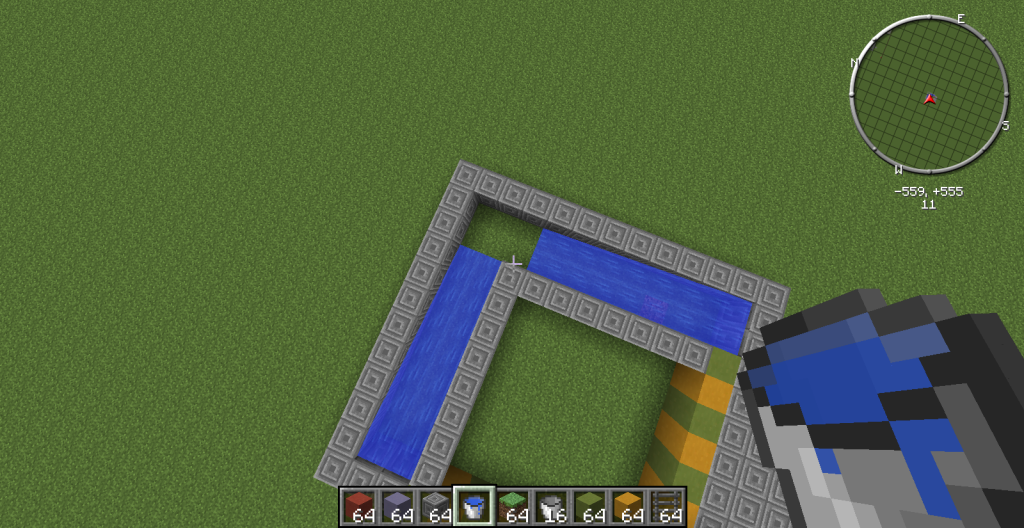
Here we have a view of the safe house - first floor. I build the water source, place my chest for building supplies and keep my bed there. It could be bigger but hey, this is just an example so we just stick to an infinite water source. With this, we can now start working on the actually mob trap.
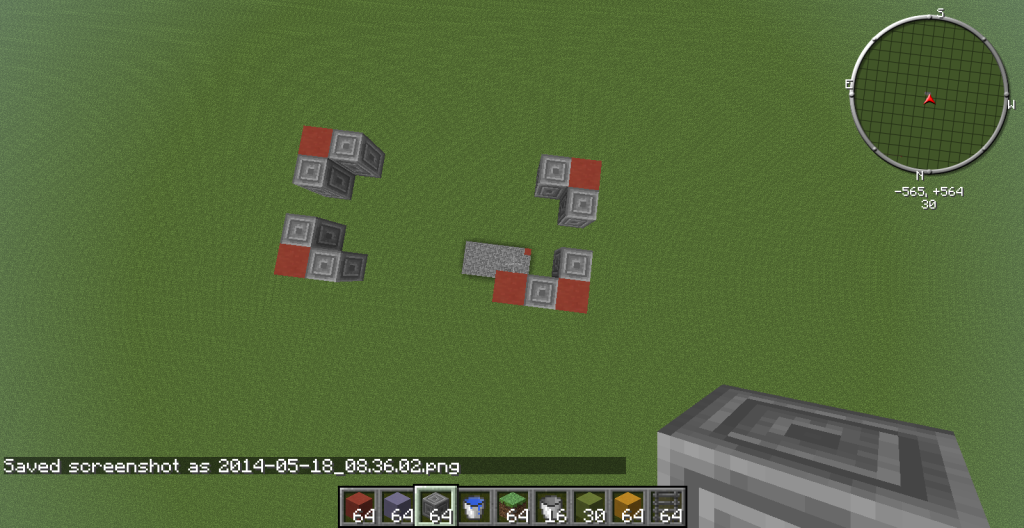
Again we start with a bit of ground work. This is a bit more important to be accurate on so we TRY to count a bit more carefully. Starting at the purple block. Count out 8 blocks. Make a square to connect. Make your water ways.
Test your water flow. It is infinitely easier to correct a build on the ground than it is up in the sky. After you've built up everything. So test before you start building up. Or........
If your test had gone correctly, the water would form a 2 x 2 square which this clearly does not. Be sure to fix the error now.
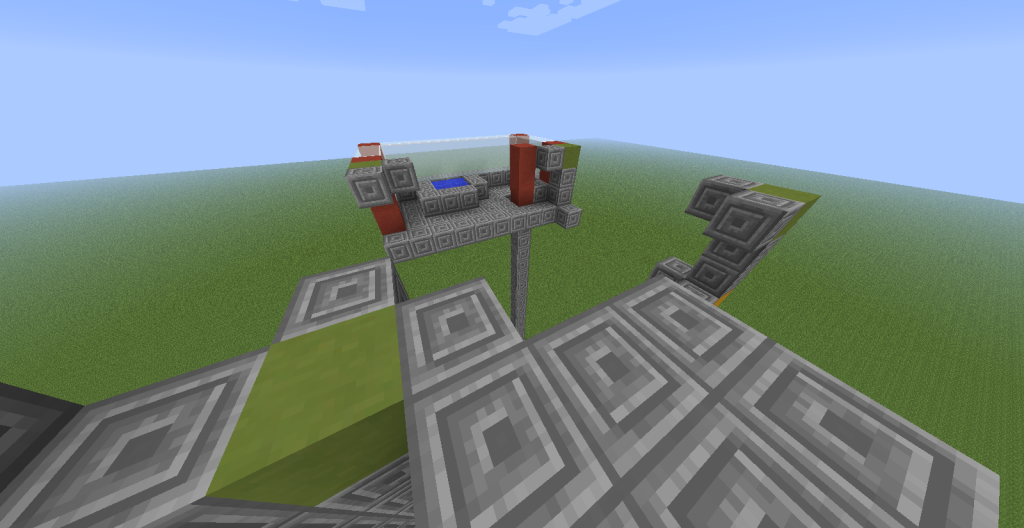
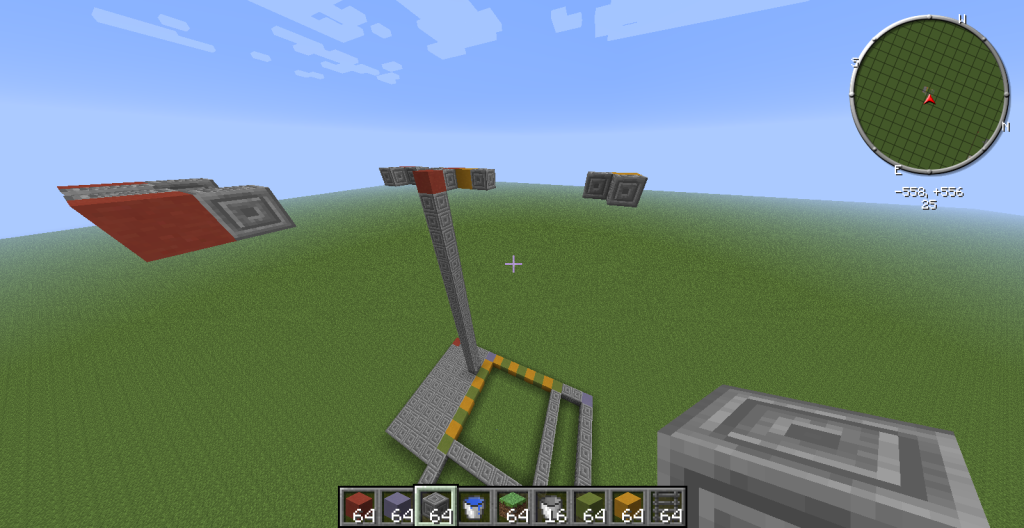
You can pillar up and mark the corners like you did for the safe house. This does make it easier to mark the 30th block height. Or..............
you can fill in the 2 x 2 drop hole as seen in the picture and frame out the surrounding and build it up to the spawn pad and water ways.
Guess which I chose?
Once surrounded, start building up around the 2x2 center. Going up about 30 blocks ensures that the majority of your mobs will be dead. If not, don't worry. You have things that can help you in AS.
Yes, we did pillar up . Just to mark the spot. But we built up by going around the square. More work for you but less nerve-racking for me. It somehow much easier going up when I have to place the block on top of another block. Less work for my shift finger anyway.
The next step is the most important step you will take up here. It will be a matter of life or death for you if you miss this step.
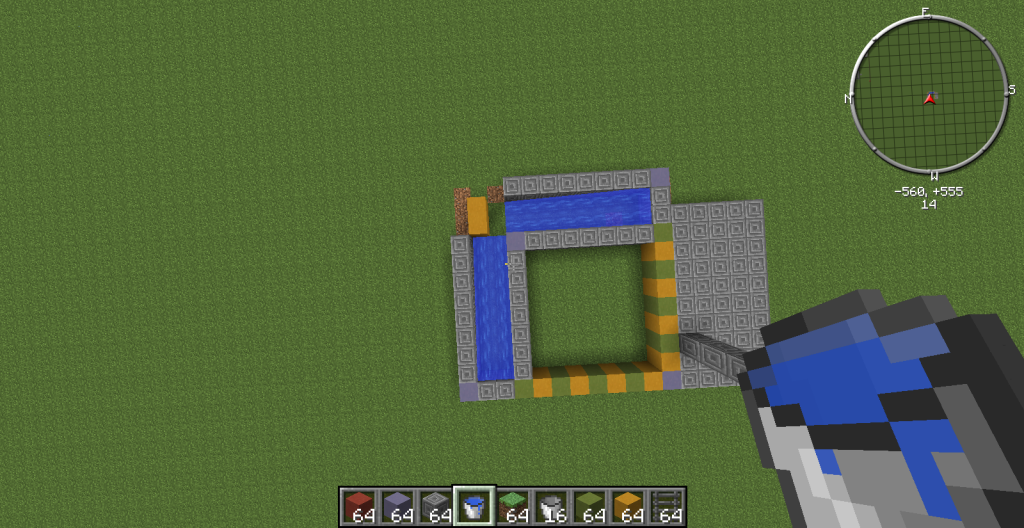
SEAL OFF THE DROP HOLE! Normally, I do this with a snow block but since glass is readily available I use it instead. Pick any block that is easier to break and easily distinguishable as the drop hole.
Now start building out for eight blocks. This is probably the only place you'll really need to count because we only did the 'ground work' for one spawn pad. At the same time build upward by 2 blocks. The bottom block will be for your water, the upper block will be for your trapdoors. You did make some right?
Run some water through each water way to make sure it's the right length. Just in case. Especially for the two you didn't have a guide for. If everything is ok, hop up and start placing your trapdoors. You can use them to walk across the gaps. When all the trapdoors are in place, start connecting your corners to form your square spawn pads.
 When you are making your pads, you might also want to light them up. Just in case. And then build up your walls at least 3 blocks - 3rd block for the roof. And build up your safe house too while you're going up. So when you build your next layer on the mob tower later, you'll have a platform to start on with your supplies. If you feel like moving.
Finally, put your roof in place. Up to now, you've been using torches to light up the room. Well, now that your roof is going into place and mobs could spawn up there too, we need something besides torches to kill two birds with one stone. In your roof, you will be placing some of your glowstones. Why?
Because in order for your mob spawner to work, it needs to be in low or no light levels. Normally most people do this by knocking out torches from the
walls and floors as they leave the room before sealing it off. The problem with this is, you are left to run around blind in the dark in a room with water leading to your death trap. Not only can you accidentally fall in, since it will be dark, it is possible that mobs wills spawn in the room with you. One wrong move and say good bye skies.
However, with a glowstone roof, you can remove the torches, make sure your trap is in order and then calmly walk out without fear of falling into your own trap because you couldn't see in the dark too well. Now climb up to the top of the roof, and replace the glowstones with torches and cobblestones. The roof will be light and the room will be dark. You have completed the fool proof trap and now all that remains will be to collect your drops. For the remaining mobs...........maybe we'll tackle that later.......
やっと遣りましたよ。モブ・タワー完成ですよ。長かったよ。解説が。疲れたから写真見て分かってもらえないかな・・・・と言うのもズボラ過ぎる気がしますので一応ザッと説明をば。ハイ。
一言ポイントです。此方の作業は勿論creativeの別世界で作っています。分かりやすいように色着きブロックを作用しました。ASで遣る場合違う石、木、素材でも良いです。
先ずは上に登って造る前に地面で作っていきます。こうする事で精神的に苦痛な作業、お空高く数えながら後ろ向き前進を出来るだけ減らしていきます。モブ・タワーより先に休み部屋を造っておきます。
何故休み部屋を造るかというと先ず疲れるからです。指が。精神が。色々とボロボロです。なので、ゆっくり安心出来てちょっと他のことも出来る場所を確保すると随分楽が出来ます。余裕が出ます。後、後程モブ・タワー改造する時在ったら便利です。補給場としたり、夜を早く進めたり、永久水源を造ったりで。ハイ。
なので、(1)の構図のように枠作りからです。次いでにモブ・タワーの枠作りも出来ます。が、此処は敢えて休み部屋に集中して、(2)空に向かってブロックを積み重ねて登って逝きます。四つの赤い角と梯子の柱にも赤を使いました。大抵は24~26ブロック当たりを目指して登ります。着いたら角を造ります。少し掘り下がって下から(赤)角をおきます。地面まで掘り下がると(2)のようになります。最後の梯子柱には掘り下がりません。登りながら梯子登りで逝きます。上に着いたら休み部屋をつくります(3)。点と点を繋ぐだけの作業です。水源を設置して、ベッドを置いたり、チェストを備えたりもします。で、終われば下に下りて今度はタワーに取り掛かります。
モブ・タワーは先ず休憩部屋と同じく枠取りです。今回は紫ブロックから初めて8個ブロックを置いていきます。四角を目指して又8個ブロックを置けば(4)のようになります。ここで念の為に水を流して確認を取ります。旨くいっていれば水が四角になるはず・・・・ですが(5)のようなこともあるのでこれを空の上で遣るより安全な地面でやって修正します。これが旨く逝けば又柱登って目印作業(6)(7)です。部分的には四角のモブ沸き場と水路で間違った部分だけでも良かったりします。こうすると高さ一々数えながら上がったり、気にしなくても一目で分かるようになります。後、一度犯す間違いは二度起こすのではなく毎回犯すので出来るだけ正解に出来るようにする為です。
で、これが出来たらモブを落とす穴を囲い(8)四角の落ち穴を目印目指して登っていきます(9)。
次に(10)落とし穴に蓋をします。落ちるのを防ぎましょう。だって、穴です。 普通落ちます。予防はした方が身のためです。自分を知るのも身のためです。ハイ。
で、ここで初めてお空で数えながら後ろ全身です8ブロック程ですが。四方向ではなく二方向だけで済むのが下準備。有難い下準備。2回回数減りました。ので、休まずブロック二個積み上げて水路の壁を作り上げていきます(11)。後は水路が正しく作動するかを検査して良かったらトラップ・ドア設置。水路から上がって沸き場の土台を敷くだけの簡単作業(12)。殆ど下を見ず、小指にも優しい沸き場作りです。後は、壁を三ブロック重ね(この高さで縁だ万沸きを防ぐーどうせ水で流す重力トラップじゃ逃げられるのが落ちなので)屋根を張ればトラップ・タワー完成です。
で、ですね?沸き場って松明着け巻くって土台作っていたんですが屋根張ると屋根にも沸くわけなんです。でもって、モブ明るいと沸かないんです。だから沸き場の中に置いた松明屋根張った後退けないといけないんです。
で、ですね?暗いとモブ沸くんです。部屋は真っ暗なのに、足元水路あるかもなのに、屋根暗いかもだし、モブ沸く確立高いかもなんです。で、そこでグロー・ストーンなのです(13)(14)。屋根張るとき所々設置するんです。すると部屋明るいんです。屋根も明るいんです。退路が簡単なんです。明かり退けも命掛けでなくてもいいんです。良い事だらけです。遠慮なく使いましょう。ハイ。
後は、屋根に上ってグロー・ストーン壊して、丸石を変わりに置いて、松明を立てて逝けば完成。モブ沸きます。地面に降りればですが。
と言うわけでモブ・タワー講座終わり・・・・・たいんですが死なないモブもいらっしゃるんですよ。ASでは。でもASですので対処方法もあったり。でも疲れたので又今度です。ハイ。
Yes, today we finally work our way around to building our fool proof mob tower - not as in - it has super efficiency or any thing like that. NO, it's like - at least this will work even if you're a total fail at anything technical and complicated. Because it's fool proof. So even if you have difficulty counting to 8 sometimes it'll work for you. Understood?
And so we begin by laying out some cobble - on the ground. And if I just explain everything it'll get really confusing so there will be quite a few pictures. And all of this was done in a creative flat world because really, I can't be bothered to take photos when I'm actually doing this in AS - much too scare.....at least in creative, you can fly. And if you can fly, the heights don't seem as bad........Anyway.
 | |
| 1 outlining is an important step |
First, we layout our safe house outline. Red is our starting block. Green is where the ladder will be. I tend to make it at least 5 wide so I can make an infinite water source upstairs later on.
 |
| 2 look no supports |
 |
| 3 safe house, done! |
 |
| 4 If you look closely...... |
Again we start with a bit of ground work. This is a bit more important to be accurate on so we TRY to count a bit more carefully. Starting at the purple block. Count out 8 blocks. Make a square to connect. Make your water ways.
 |
| 5 Did you notice the water way was longer? |
If your test had gone correctly, the water would form a 2 x 2 square which this clearly does not. Be sure to fix the error now.
 |
| 6 corners to line up |
 |
| 7 filling in the middle |
Guess which I chose?
 |
| 8 go around the square one by one until... |
Once surrounded, start building up around the 2x2 center. Going up about 30 blocks ensures that the majority of your mobs will be dead. If not, don't worry. You have things that can help you in AS.
 |
| 9 up to 30 |
 |
| 10 sealing up |
SEAL OFF THE DROP HOLE! Normally, I do this with a snow block but since glass is readily available I use it instead. Pick any block that is easier to break and easily distinguishable as the drop hole.
 |
| 11 leave one block to step up |
 |
| 12 Repeat for four spawn pads |
 When you are making your pads, you might also want to light them up. Just in case. And then build up your walls at least 3 blocks - 3rd block for the roof. And build up your safe house too while you're going up. So when you build your next layer on the mob tower later, you'll have a platform to start on with your supplies. If you feel like moving.
 |
| 13 spawnable so a glowstone here |
Because in order for your mob spawner to work, it needs to be in low or no light levels. Normally most people do this by knocking out torches from the
 |
| 14 bright and no torches |
However, with a glowstone roof, you can remove the torches, make sure your trap is in order and then calmly walk out without fear of falling into your own trap because you couldn't see in the dark too well. Now climb up to the top of the roof, and replace the glowstones with torches and cobblestones. The roof will be light and the room will be dark. You have completed the fool proof trap and now all that remains will be to collect your drops. For the remaining mobs...........maybe we'll tackle that later.......
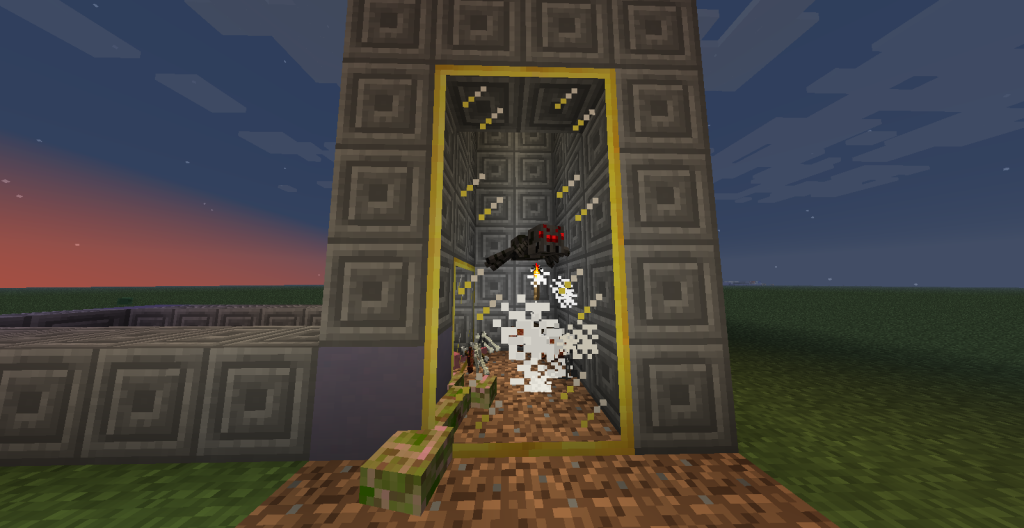 | ||
| 15 AND IT WORKS! |
褒めて下さい!
一言ポイントです。此方の作業は勿論creativeの別世界で作っています。分かりやすいように色着きブロックを作用しました。ASで遣る場合違う石、木、素材でも良いです。
先ずは上に登って造る前に地面で作っていきます。こうする事で精神的に苦痛な作業、お空高く数えながら後ろ向き前進を出来るだけ減らしていきます。モブ・タワーより先に休み部屋を造っておきます。
何故休み部屋を造るかというと先ず疲れるからです。指が。精神が。色々とボロボロです。なので、ゆっくり安心出来てちょっと他のことも出来る場所を確保すると随分楽が出来ます。余裕が出ます。後、後程モブ・タワー改造する時在ったら便利です。補給場としたり、夜を早く進めたり、永久水源を造ったりで。ハイ。
なので、(1)の構図のように枠作りからです。次いでにモブ・タワーの枠作りも出来ます。が、此処は敢えて休み部屋に集中して、(2)空に向かってブロックを積み重ねて登って逝きます。四つの赤い角と梯子の柱にも赤を使いました。大抵は24~26ブロック当たりを目指して登ります。着いたら角を造ります。少し掘り下がって下から(赤)角をおきます。地面まで掘り下がると(2)のようになります。最後の梯子柱には掘り下がりません。登りながら梯子登りで逝きます。上に着いたら休み部屋をつくります(3)。点と点を繋ぐだけの作業です。水源を設置して、ベッドを置いたり、チェストを備えたりもします。で、終われば下に下りて今度はタワーに取り掛かります。
モブ・タワーは先ず休憩部屋と同じく枠取りです。今回は紫ブロックから初めて8個ブロックを置いていきます。四角を目指して又8個ブロックを置けば(4)のようになります。ここで念の為に水を流して確認を取ります。旨くいっていれば水が四角になるはず・・・・ですが(5)のようなこともあるのでこれを空の上で遣るより安全な地面でやって修正します。これが旨く逝けば又柱登って目印作業(6)(7)です。部分的には四角のモブ沸き場と水路で間違った部分だけでも良かったりします。こうすると高さ一々数えながら上がったり、気にしなくても一目で分かるようになります。後、一度犯す間違いは二度起こすのではなく毎回犯すので出来るだけ正解に出来るようにする為です。
で、これが出来たらモブを落とす穴を囲い(8)四角の落ち穴を目印目指して登っていきます(9)。
次に(10)落とし穴に蓋をします。落ちるのを防ぎましょう。だって、穴です。 普通落ちます。予防はした方が身のためです。自分を知るのも身のためです。ハイ。
で、ここで初めてお空で数えながら後ろ全身です8ブロック程ですが。四方向ではなく二方向だけで済むのが下準備。有難い下準備。2回回数減りました。ので、休まずブロック二個積み上げて水路の壁を作り上げていきます(11)。後は水路が正しく作動するかを検査して良かったらトラップ・ドア設置。水路から上がって沸き場の土台を敷くだけの簡単作業(12)。殆ど下を見ず、小指にも優しい沸き場作りです。後は、壁を三ブロック重ね(この高さで縁だ万沸きを防ぐーどうせ水で流す重力トラップじゃ逃げられるのが落ちなので)屋根を張ればトラップ・タワー完成です。
で、ですね?沸き場って松明着け巻くって土台作っていたんですが屋根張ると屋根にも沸くわけなんです。でもって、モブ明るいと沸かないんです。だから沸き場の中に置いた松明屋根張った後退けないといけないんです。
で、ですね?暗いとモブ沸くんです。部屋は真っ暗なのに、足元水路あるかもなのに、屋根暗いかもだし、モブ沸く確立高いかもなんです。で、そこでグロー・ストーンなのです(13)(14)。屋根張るとき所々設置するんです。すると部屋明るいんです。屋根も明るいんです。退路が簡単なんです。明かり退けも命掛けでなくてもいいんです。良い事だらけです。遠慮なく使いましょう。ハイ。
後は、屋根に上ってグロー・ストーン壊して、丸石を変わりに置いて、松明を立てて逝けば完成。モブ沸きます。地面に降りればですが。
と言うわけでモブ・タワー講座終わり・・・・・たいんですが死なないモブもいらっしゃるんですよ。ASでは。でもASですので対処方法もあったり。でも疲れたので又今度です。ハイ。
Friday, May 16, 2014
Getting Distracted
Again. I started playing with my planter and harvester. And I both love it and hate it. I also played with my sludge boiler and I can see it might be replacing some of the pulverizers. Already some things are becoming obsolete.
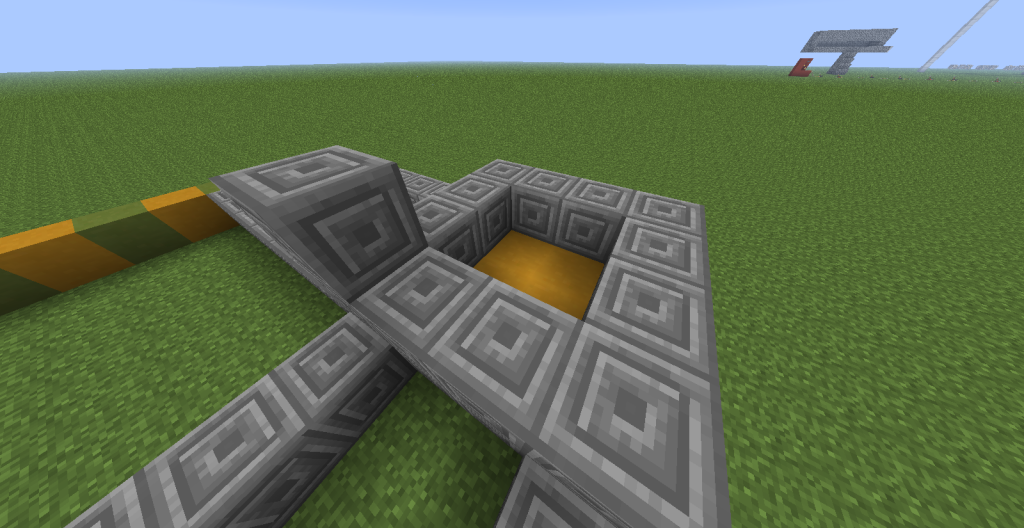
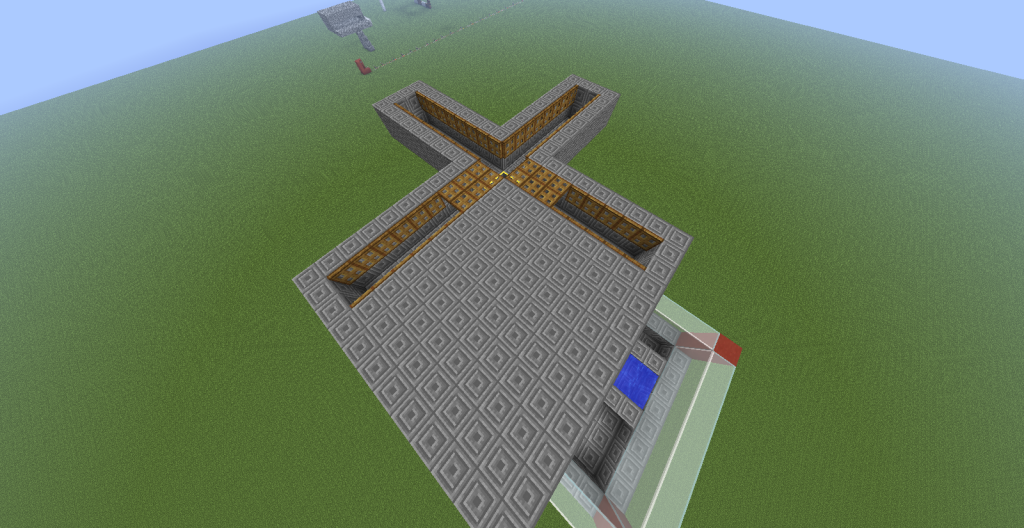
This was suppose to be my 'farming' area.
I had originally planned to have to seven pads on each sides extending outward for all my trees and plants. There was also going to be a straight line out from the top extending to a tower for animals. The pads would have a bunch of harvesters and other plant-related automations running each 'field'.
However, after playing with a simple set-up for a 3x3 area with a planter, harvester, fertilizer, wiring, batteries and a temporary sludge system, I might have to re-think my initial plans. First of all, the darn thing produces a whole lot of mats in a relatively short period of time effortlessly. Which is nice, but also makes me think that maybe I don't need to have all of the 14 pads set up with a 'field' full of these automations. In fact, it did feel like a pad or two devoted to this purpose should sufficiently provide more than adequately for anything I might need.
Secondly, and this was admittedly the reason I might not do a full blown scale of automation for the 14 pads, it was ugly. And bulky. Even by my standards. Maybe it was the way I set it up but from what I've been looking up this does seem to be the standard way in which one of these systems is suppose to work. It is about 3 - 4 blocks high though and took a 5 x 5 area if you count in the wiring systems.
**The problem also lies in my conceptualization for this skyblock - I was planning to have devoted areas - farming, magic, danger zones, electrical energies, etc. So all my generators or power is being drawn from the backside of the original island. Which currently means a lot of running back and forth with batteries as I have no wires installed yet. And if I were to run wires, it just seems ....... unseemly? Just not quite what I was envisioning when I was thinking up my plans for this island. Goes to show you really shouldn't cement your plans until you know what you're up against.**
I suppose I could do one of two things now to help deal with this bulkiness problem I am having. The first would be to bury the problem. This means I would have a lower platform under the current platform and hide all the mechanics under the floor level and just leave the tops of the machines showing. The other way would be to build up an outer wall. I currently have the outer rim of the pads lined with glass. I could instead make a wall of opaque blocks that would go up to the top level where the dirt and machine currently occupy. This would mean that the current floor level will be 4 - 5 blocks low than the top level so you couldn't see it from there. Of the two plans, I am currently leaning towards the later plan simply because I don't have to go downwards. Up is so much easier.
This was suppose to be my 'farming' area.
 |
| Imagine the same extending to the left for a finished product |
I had originally planned to have to seven pads on each sides extending outward for all my trees and plants. There was also going to be a straight line out from the top extending to a tower for animals. The pads would have a bunch of harvesters and other plant-related automations running each 'field'.
However, after playing with a simple set-up for a 3x3 area with a planter, harvester, fertilizer, wiring, batteries and a temporary sludge system, I might have to re-think my initial plans. First of all, the darn thing produces a whole lot of mats in a relatively short period of time effortlessly. Which is nice, but also makes me think that maybe I don't need to have all of the 14 pads set up with a 'field' full of these automations. In fact, it did feel like a pad or two devoted to this purpose should sufficiently provide more than adequately for anything I might need.
Secondly, and this was admittedly the reason I might not do a full blown scale of automation for the 14 pads, it was ugly. And bulky. Even by my standards. Maybe it was the way I set it up but from what I've been looking up this does seem to be the standard way in which one of these systems is suppose to work. It is about 3 - 4 blocks high though and took a 5 x 5 area if you count in the wiring systems.
**The problem also lies in my conceptualization for this skyblock - I was planning to have devoted areas - farming, magic, danger zones, electrical energies, etc. So all my generators or power is being drawn from the backside of the original island. Which currently means a lot of running back and forth with batteries as I have no wires installed yet. And if I were to run wires, it just seems ....... unseemly? Just not quite what I was envisioning when I was thinking up my plans for this island. Goes to show you really shouldn't cement your plans until you know what you're up against.**
I suppose I could do one of two things now to help deal with this bulkiness problem I am having. The first would be to bury the problem. This means I would have a lower platform under the current platform and hide all the mechanics under the floor level and just leave the tops of the machines showing. The other way would be to build up an outer wall. I currently have the outer rim of the pads lined with glass. I could instead make a wall of opaque blocks that would go up to the top level where the dirt and machine currently occupy. This would mean that the current floor level will be 4 - 5 blocks low than the top level so you couldn't see it from there. Of the two plans, I am currently leaning towards the later plan simply because I don't have to go downwards. Up is so much easier.
人生横道ソウ~ラン
と言う訳で、どういう訳か考えてはいけません、今日もモブさんいません。ハイ。
実は機械弄りに請っている最中です。昨夜はPlanter植え機とHarvester収穫くんと手を取り合って、Fertilizer小屋氏に餌を与えてドロンドロンなSludge処分の為にSludge Boilerドロン変換機を行き来する羽目になって大変楽しく過ごしていました。
これ等の農業自動機ですが、効果凄すぎだ!っと判ることが出来ました。3x3の畑に木の栽培を試してみたのですがアッと言う間にoak、birch、spruce、の苗木等が見る見る在庫に溜まること。これを自分が遣ると何時間も掛かるのに・・・・・人間進化ですね?でも、これ程凄いと返って数は然程多くなくてもいいんじゃないかと言う思いにも駆られたりしました。因って、今迄狭すぎるかなと思いながら造っていた農園畑の土台ですが返って大き過ぎたかなと思うようにも。ハイ。
後、組み立ててみて分かったのですがこの自動式農業園ってかなり嵩張るシロモノです。高さが約4~5ブロック と幅の広さを5x5陣取る様です。見た目にもこう・・・・・剥き出し過ぎになっているようで想像していた綺麗で可愛い農園畑とは懸け離れたモノでした。
この見た目を改善するには地面に埋めていくか壁を建てていくかした方が良いのか色々と試して見るかもだったり。然程綺麗に整理出来るとは思っていませんが遣るだけは遣って見る積もりです。で、当分モブさん解説には手が回らないかもです。ハイ。
Thursday, May 15, 2014
Almost Me-Proof Mob tower - unnecessarily long and wasteful
And I was going to write it all out but it got really confusing even for me so I decided I'll probably go do this next time with some pictures instead. It's just a plain old drop type mob tower but being me, I had to complicate it a lot.
So instead maybe I'll just do a look-ahead section to see what I've discovered so far.
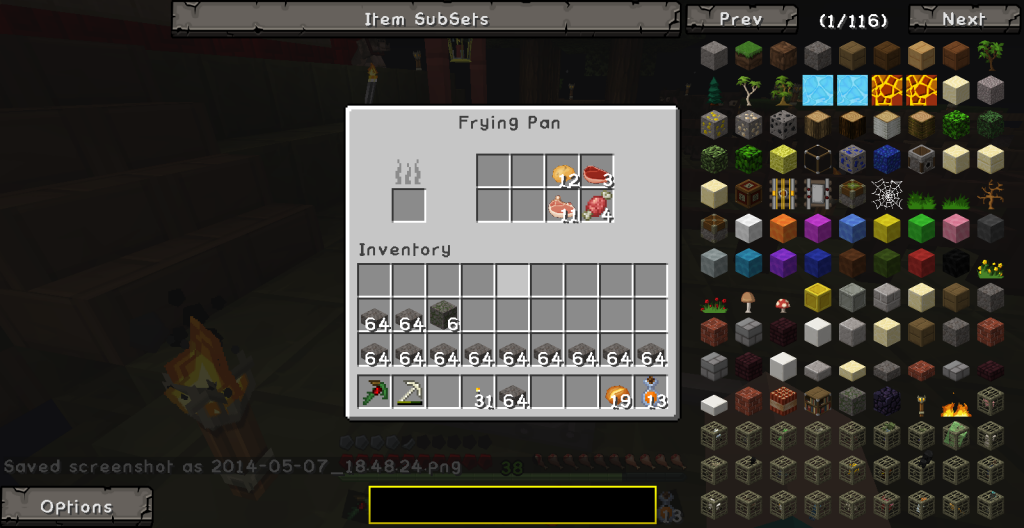
Here we have a list of things that can be used right out of the box, so to speak. They require no additional power or wiring and can be fairly useful from early on in your Agrarian Skies adventure. Although the use of one of the listed items depends on your play style. All these items just need to be placed and will work automatically. Like the peaceful table which was extremely helpful because I didn't want deal with an escaping enderman running around my little island for the sake of a quest. All it required was a flip of a switch. Though I might try something else later on to see if there might have been another way in normal mode.
The following list of things would have made life much easier on skyblock also but unfortunately did not come with any batteries included. So you do have to go and figure out a battery and/or wiring system that will work into your design. The discovery of these items were a moment of triumph and defeat. Never was I so disappointed as when I figured out that the grinder wouldn't work in my mob tower without some assistance.
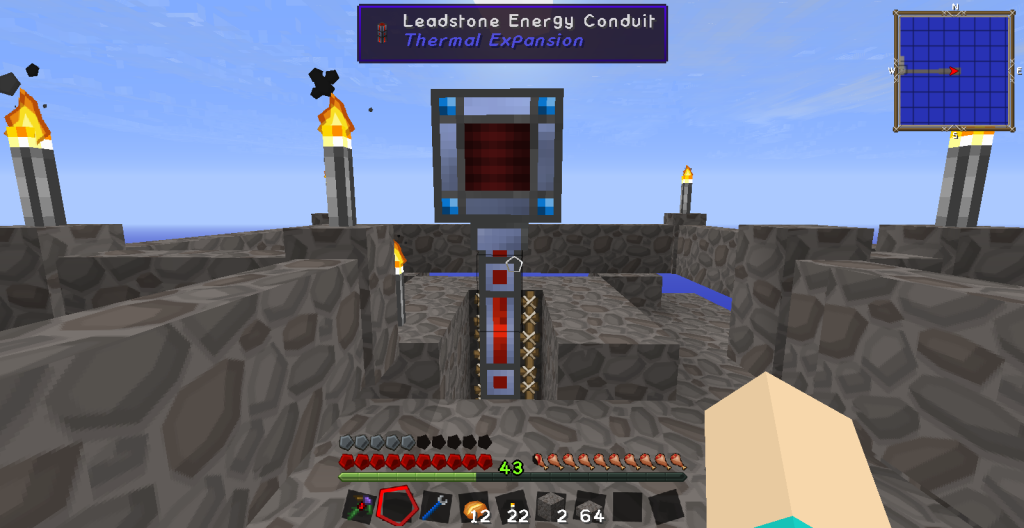
But since we did want to have an easier life up here, it seems we must overcome the barrier which would hold us back - the lack of power to run these machines. And to that end, I was so happy when I discovered this.
A TNT generator. Talk about living dangerously. I was so glad that I now finally have something to do with all the gunpowder instead of just chucking it at a cactus. Maybe now it can be of use somehow - if I don't blow myself to smithereens first. The best thing about this thing was that it didn't seem to need a lot of gunpowder to run at full capacity. Just 8 gunpowder to be full. Was that good or bad? I'm still unsure but it runs my 3 pulverizers fairly well at the moment. And I did build it a platform a bit off from my main island - just in case. No real harm so far though it did hurt a bit when you stayed too close for too long.
And for those machines that are too far away to connect to at the moment? Well, it does require some running back and forth but this thing can serve as a portable batteries and back up generators for machines that are not tied into the grid at the moment.
And no, I don't mean the conduit.
 で、此処で終われないので。いえ、ですね? 楽したいじゃないですか?楽の為の苦労なら進んでしょうと思う自分なんです。その為にも色々調べた挙句目に付いたのがTNTGenerator又の名が時限爆弾発電機装置です。ハイ。
So instead maybe I'll just do a look-ahead section to see what I've discovered so far.
 |
| the JOY! |
Here we have a list of things that can be used right out of the box, so to speak. They require no additional power or wiring and can be fairly useful from early on in your Agrarian Skies adventure. Although the use of one of the listed items depends on your play style. All these items just need to be placed and will work automatically. Like the peaceful table which was extremely helpful because I didn't want deal with an escaping enderman running around my little island for the sake of a quest. All it required was a flip of a switch. Though I might try something else later on to see if there might have been another way in normal mode.
 |
| the DEFEAT q.q |
But since we did want to have an easier life up here, it seems we must overcome the barrier which would hold us back - the lack of power to run these machines. And to that end, I was so happy when I discovered this.
 |
| On another skyblock somewhere |
 |
| Hello there. Just sticking my head out for a bit. |
And no, I don't mean the conduit.
勢い良く潔く
さぁ~モブタワー簡単講座と逝こうとしたのですが勢いを挫かれました。だって、余りにも酷かったんです。自分で書いててチンプンカンプンぐるぐる回りに鳴るばかりで遣っている最中は良かったんですがいざ説明をしようとすると明白に出来ない思考回廊。迷いました。本当に簡単なドロップ式モブタワーな筈なのですが自分式にするとややこしさが。なので本日はちょっと先観をしたいと想います。タワー解説は又今度写真付きで遣っていくかもです。決してメンドクサクナッタナと想った訳ではありません。ハイ。
詳しくは後程又ダラダラと書くことになると思いますが先ず自動式マシン軍に付いてです。有難いことに最初に造った二つの自動式マシンのIE君とAA君、又の名を横暴くん、は実際自動式で電池込みなモノだったので簡単に逝きました。縁だ万退治クエストに困った時に使ったPeaceful Table平和の円卓も設置して待てば縁だ万を無事討伐出来たのですがそうも行かないモノもありました。
 |
| 失敗の巻。何故の謎でした。 |
主にgrinder始末屋、Pulverizer又の名をハンマ君、Induction Smelterドロドロ釜、畑の夫婦PlanterとHarvester等等。これらの物を調子に乗って造ってみるも使えませんでした。モブタワー完了で後は生き残りの始末かと思いGrinderもポンっと設置してみたのですが作動しませんでした。何故何故何故?の大嵐の末やっとパンネールGUIを見たのですが緑色の雷が在るじゃないですかと言う事に気付き自動式にも完全自動じゃない式もあるんだという事が理解できた瞬間でした。
 で、此処で終われないので。いえ、ですね? 楽したいじゃないですか?楽の為の苦労なら進んでしょうと思う自分なんです。その為にも色々調べた挙句目に付いたのがTNTGenerator又の名が時限爆弾発電機装置です。ハイ。
火薬を使い発電するのです。今迄困っていた爆薬もこれで役立ち道具に!と言うだけでも有難いのですがどうもこの発電機装置爆薬を然程使わずに満タン状態になる様でこれなら他の機会に十分な燃料を廻せるのではと思わせてくれるモノでした。と言う訳で島からちょっと離れた位置に発電塔を建ててイソイソしているところです。 最近では線を引いてPulverizerを三台程稼動中です。それ迄はバッテリを充電して行ったり来たりをしていました。地味に爆発する発電機なのでチクチクと痛かったです。後爆音が・・・・・・・後でそうゆう装置も施さなければです。ハイ。
Wednesday, May 14, 2014
The tension's a bit low today
Mom started off in a mad (read crazy) moment today. Insisted on going home the moment I woke up. It gets to be a bit tiring. Hopefully, she'll be improved when I go pick her up from daycare. But we continue as we must.
Especially since today is the day we start catching up! Cuz we're finally automating today. Yes, by the end of today, some real progress shall be made - at least, I hope it will.
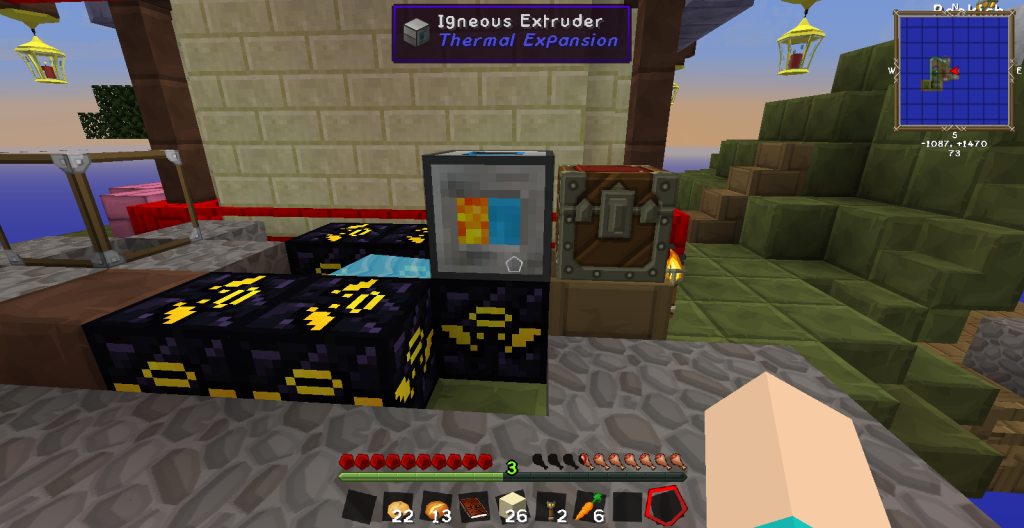
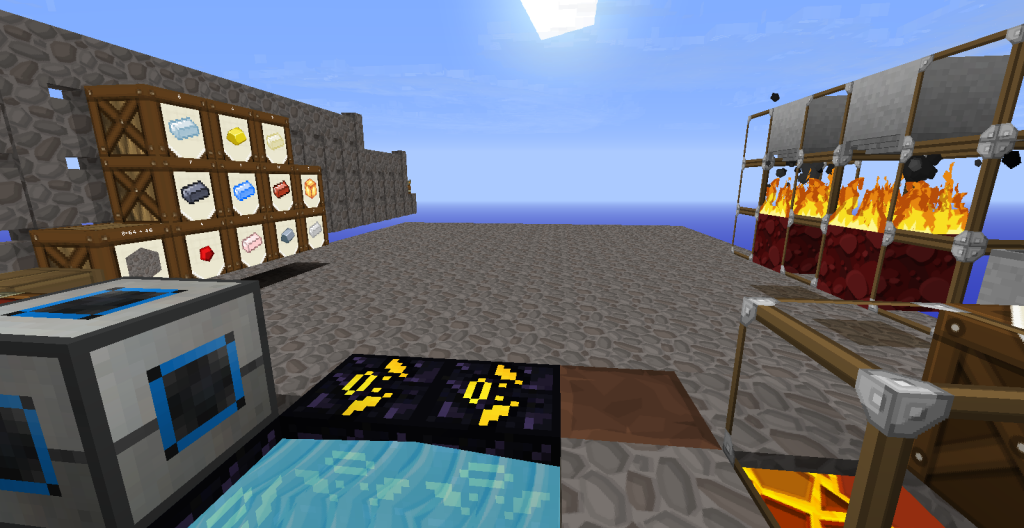
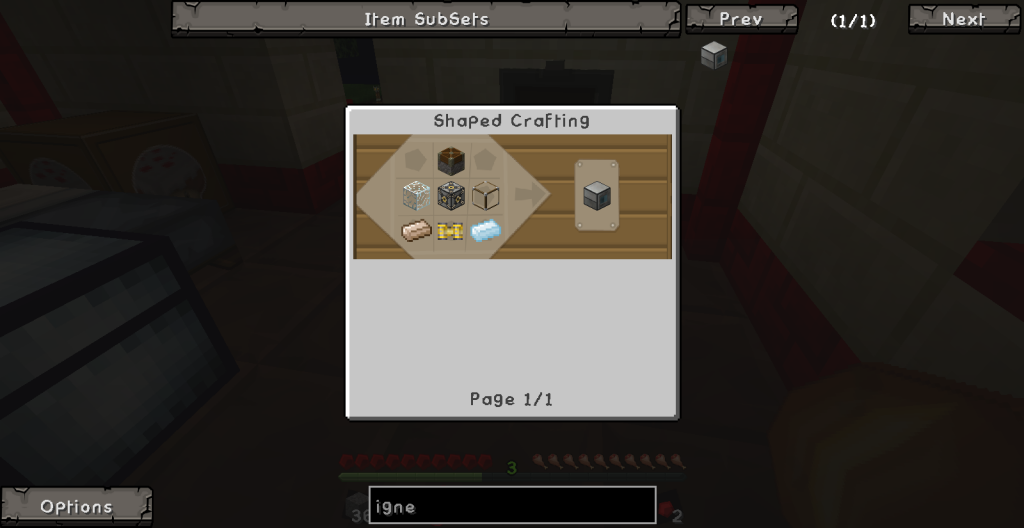
At any rate, since the enlightening moment we had yesterday - when we finally remembered that furnaces can smelt ores into ingots - we've managed to hammer out the necessary ores. And looking up the recipe again on NEI, we finally, finally make the Igneous Extruder. Isn't she lovely?
Kind of anticlimatic? But I mean, really, it's not all that hard to make one, it just took some time getting all the mats together to make her with all the turns we took along the way. She is a lovely sight though - with her front panel showing us the lava and water she has inside. It took up to four buckets of each to fill her up and I was glad I left the old cobble generator in place with its water just in case. Because you can click on the machine with a lava bucket to fill it up but if you click it with the wrong button, the lava will pour on to you instead. Now, which button was it again????
At any rate, we pick this little baby up with its water and lava and set her up where we most need the stones right now - the back of the house where we will extend the platform outward to build our mob tower. The chest we place at her side so she can spit out the cobble for us to use from there. You could also do some pipe work and move the stones to your storage system, but I wasn't really ready for piping at this time yet. After all, you need a lot more mats for building those things. And luckily, the orange opening on the machine just happened to fall on the side where we could place a chest - so why make life more complicated than it has to be. I already make it more complicated than it has to be so let's make things that can be simple - simple.
So while we're waiting for the little machine to build up enough cobble for the platform extension and eventual mob tower, we work along side at the old cobble generator now a converted into a gravel generator. We see that we need more boxes for storage, more extension on the platform, more stone for walls (wouldn't want to accidently fall off), an area for the smeltery maybe? What else will we fit in here - kinda depends on all the quests I still haven't done yet.
And all those automation we saw. I mean, this automated cobble maker makes life so easy now, if I had all those other automated machines I saw maybe it will be even easier? Hmmmmm, maybe we could even automate this gravel making process. After all, all I do is press down on the left button and catch the gravel that drops from the generator. Maybe we could get a machine to kill the mobs too and collect the drops? Maybe we could sift the gravel, sand and dust automatically too? Or even make the sand and dust automatic too?
And so on and so forth I went, little realizing that I got lucky that the Igneous Extruder was my first machine automation. After all, the thing comes with batteries included and little maintenance required............the headache that awaits............but the mob tower first.
良く働いてくれるお婿大苺です。あ、いえ、大一号です。水と溶岩をバケツに汲んでIE君に向かってクリックするだけであっという間に4バケツ満タンです。直ぐにも起動できますが横のオレンジ色の開け口にチェストをくっ付けると自動的に丸石を収納してくれます。便利です。自分でお片付けが出来る旦那さまです。素敵です。
又、パイプを使って色々溶岩、水の付け足しとか丸石、SmoothStone, Obsidian黒曜石をそれぞれの収納箱に運んだり出来るかもしれませんがそれをするには未だパイプ材料が・・・・・・それに唯で際事態をややこしくする自分がこの段階でその様な大逸れた事をしようモノなら・・・・自分を知ることも大事だと想うんですよね?ね?
という訳で一号くん設置です。その横で夫婦宜しくな感じで丸石製造機改めて砂利製造機でコツコツと鉱石を発掘しながらこれからの計画を妄想して逝きました。自動式にすれば人生楽に違いないとこの時、勘違いをしていました。
砂利、砂、粉の製造機も造れないかな?餅つきの要領で付く奴と置く奴がいればいいのかな?モブタワー珠に生き残りがいるから始末できるのもいた様な~?落し物片付けも疲れるので拾ってくれるメイドさんも欲しいし、庭の木の伐採をしたり畑に水遣り収穫をしてくれる庭師もいれば・・・と色々人生バラ色の妄想でした。実際は地獄に突き落とす悪魔の囁きだったに違いないと今では想うのです。
でもバラも地獄も後々、モブ・タワーが未だです。次回簡素阿呆でも出来たモブ・タワー。恐怖で数えなくても大丈夫。点と点を目指して後ろ向き前進です。
Especially since today is the day we start catching up! Cuz we're finally automating today. Yes, by the end of today, some real progress shall be made - at least, I hope it will.
 |
| Am I not beautiful? ^.^ |
Kind of anticlimatic? But I mean, really, it's not all that hard to make one, it just took some time getting all the mats together to make her with all the turns we took along the way. She is a lovely sight though - with her front panel showing us the lava and water she has inside. It took up to four buckets of each to fill her up and I was glad I left the old cobble generator in place with its water just in case. Because you can click on the machine with a lava bucket to fill it up but if you click it with the wrong button, the lava will pour on to you instead. Now, which button was it again????
At any rate, we pick this little baby up with its water and lava and set her up where we most need the stones right now - the back of the house where we will extend the platform outward to build our mob tower. The chest we place at her side so she can spit out the cobble for us to use from there. You could also do some pipe work and move the stones to your storage system, but I wasn't really ready for piping at this time yet. After all, you need a lot more mats for building those things. And luckily, the orange opening on the machine just happened to fall on the side where we could place a chest - so why make life more complicated than it has to be. I already make it more complicated than it has to be so let's make things that can be simple - simple.
 |
| Looking Ahead .....Automation before Smeltery |
So while we're waiting for the little machine to build up enough cobble for the platform extension and eventual mob tower, we work along side at the old cobble generator now a converted into a gravel generator. We see that we need more boxes for storage, more extension on the platform, more stone for walls (wouldn't want to accidently fall off), an area for the smeltery maybe? What else will we fit in here - kinda depends on all the quests I still haven't done yet.
And all those automation we saw. I mean, this automated cobble maker makes life so easy now, if I had all those other automated machines I saw maybe it will be even easier? Hmmmmm, maybe we could even automate this gravel making process. After all, all I do is press down on the left button and catch the gravel that drops from the generator. Maybe we could get a machine to kill the mobs too and collect the drops? Maybe we could sift the gravel, sand and dust automatically too? Or even make the sand and dust automatic too?
And so on and so forth I went, little realizing that I got lucky that the Igneous Extruder was my first machine automation. After all, the thing comes with batteries included and little maintenance required............the headache that awaits............but the mob tower first.
今日はちょっと
朝からお騒がせな母に色々と。ええ、色々と。ちょっと疲れ気味な自分です。でも、今日もガンバです。
と言う訳で今日やっと作っちゃいました。いや、前から造っていたのですが今日やっと造ったことに関して書くことが出来ました。材料が揃えば簡単です。自分思考が難しくしていくだけです。
良く働いてくれるお婿大苺です。あ、いえ、大一号です。水と溶岩をバケツに汲んでIE君に向かってクリックするだけであっという間に4バケツ満タンです。直ぐにも起動できますが横のオレンジ色の開け口にチェストをくっ付けると自動的に丸石を収納してくれます。便利です。自分でお片付けが出来る旦那さまです。素敵です。
又、パイプを使って色々溶岩、水の付け足しとか丸石、SmoothStone, Obsidian黒曜石をそれぞれの収納箱に運んだり出来るかもしれませんがそれをするには未だパイプ材料が・・・・・・それに唯で際事態をややこしくする自分がこの段階でその様な大逸れた事をしようモノなら・・・・自分を知ることも大事だと想うんですよね?ね?
という訳で一号くん設置です。その横で夫婦宜しくな感じで丸石製造機改めて砂利製造機でコツコツと鉱石を発掘しながらこれからの計画を妄想して逝きました。自動式にすれば人生楽に違いないとこの時、勘違いをしていました。
砂利、砂、粉の製造機も造れないかな?餅つきの要領で付く奴と置く奴がいればいいのかな?モブタワー珠に生き残りがいるから始末できるのもいた様な~?落し物片付けも疲れるので拾ってくれるメイドさんも欲しいし、庭の木の伐採をしたり畑に水遣り収穫をしてくれる庭師もいれば・・・と色々人生バラ色の妄想でした。実際は地獄に突き落とす悪魔の囁きだったに違いないと今では想うのです。
でもバラも地獄も後々、モブ・タワーが未だです。次回簡素阿呆でも出来たモブ・タワー。恐怖で数えなくても大丈夫。点と点を目指して後ろ向き前進です。
Tuesday, May 13, 2014
Progress would be so much faster
If I would learn to concentrate. So much to automate. So much to build yet. So many quests left. Then again, if we could just figure out this piping thing with the redstone energy cells, thing would go so much faster. But we're getting way ahead of ourselves. After all, we've still yet to automate our cobble production here. So back to the story as it were.
Our progress yesterday was impeded by the lack of ingots to build our cobblestone generator. Now, if we had remembered that we could just smelt the blocks of ore in our furnace at the time we were doing this, we would not have had to started on gathering mats to build our smeltery. But as this miracle did not happen, on to the building of our smeltery.
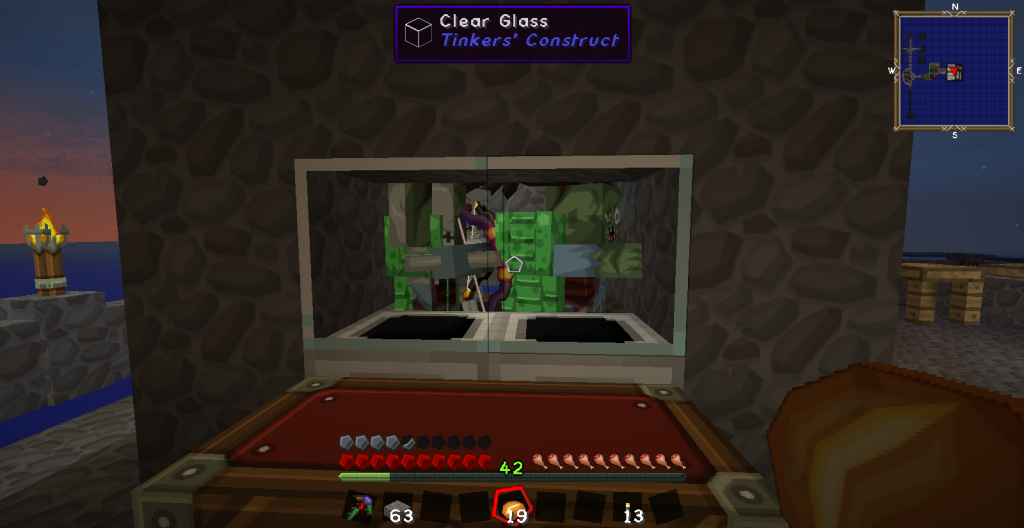
The Smeltery as its name suggests is a part of Tinkers Construct (TC) where we dump ore in and smelt them into melted metals with which we can cast tool and weapon pieces, make ore ingots and blocks. It also works on stone and sand but doesn't do well with foods. And so it is a cooking pot - fairly large - for molten metals that needs lava to cook.
The instructions for building a Smeltery can be found in one of the books give to us when we built our tool station for the TC quest eariler on. You can also make one - the instructions for which is found in NEI. Feel free to look it up if you lost the other one. Basic materials for making the smeltery consist of bricks, bricks and more bricks. But these are special bricks made from grout. Grout? You can make bricks out of grout? o.o
Apparently, you can with TC. All it takes is a bit of sand, gravel and clay ball and we can craft one. Once we take this block of grout and we smelt it, we end up with a seared brick which when you combine four will turn into a block of seared bricks (plural for the block and different from the singular brick). You will need several bricks and bricks to build the smeltery. The Smeltery is fashioned like a big pit with a bottom 3 x 3 square and walls (built out on the 5th block and not on top of the 3 x 3) as high as you have bricks. The four corners can be omitted but placing the casting table and bin there was convenient for later automation. The only necessary pieces would be the controller, tank, drain, table, and bin. All other seared blocks placed just have to close off the smeltery to form the pit.
Two pieces of the smeltery that must be made and placed next to each other are the Smeltery Controller and Seared Tank. The tank is the interface you need to fill with lava - which you can do by clicking on it with a lava bucket - be ready to pick up the lava if you happen to click with the wrong button. A pool of water close by is always a handy thing to have (o.o) when you're playing with fire. You can run some piping into it later on when you're ready too. The controller is the safe way you place the ore pieces you want to melt in the pit. It also shows you what metals you have melted down in the pit itself. You would click on the metal you want to pour out and it will be placed on the bottom of the pit ready to pour out from the smeltery drain attachments.
Having two drains would help make the smeltery work best - one for the casting table and the other for the casting basin. The casting bin is where you pour out 9 ingots worth of metal to form a block of the metal. Or glass. If you melted down your sand in the pit and poured out your liquid sand it would cool and form a clear glass which unlike vanilla glass has nothing to obstruct the view and when broken will drop and not be gone forever like vanilla glass - good if you have a habit of misplacing glass.
The casting table is where you make your molds, tool and weapon pieces and your ingots. To make your ingots you need to make a molding cast of an ingot. You do this by pouring aluminum brass over your ingot.
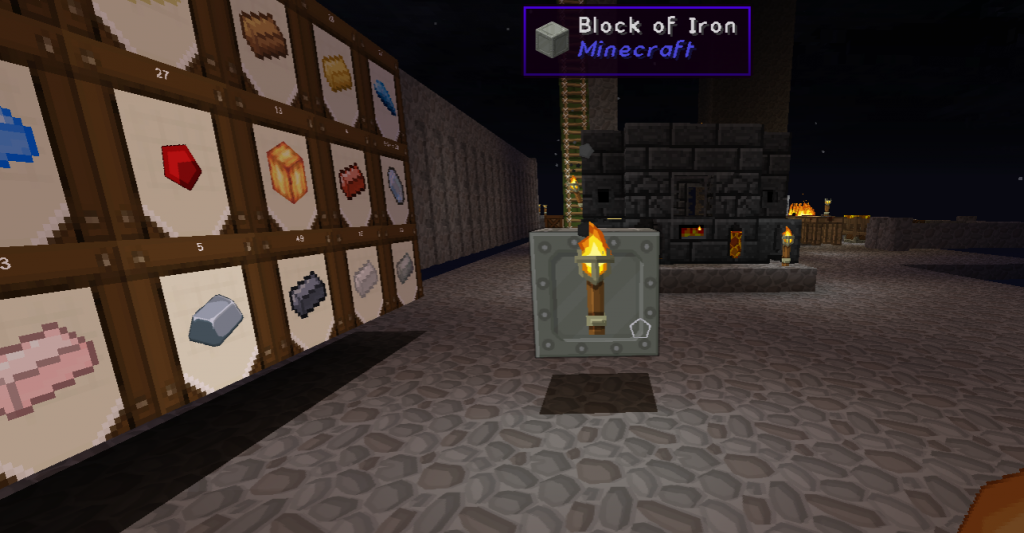 |
| The Smeltery and the reason we want to upgrade - see the block of iron? o.o |
At least we didn't actually build the thing. And goes off to cook up some ores in the furnace............tomorrow automation, maybe..........
ふらふら~ヒラヒラ~
という進行具合。真っ直ぐ進めばスラスラ~よ。 実際の日記連載よりスラスラと進められているんですよ。唯実際に起きた出来事を記録していくととてもそうと思えないだけです。本当に何時になったらレッド・ストーン謎々コーナを開催できるのやら。昨夜要約レッド・ストーン・電池セルを発動できた感動をお披露目したいのに。
と言う訳で、サクサク工房造りに勤しみましょう。 この時点でインゴット=竈で焼く方式が思え出せていたら造らなくても良かった工房。愚痴っても始まらないのでサクサクです。
先ずは工房に必要なモノ。Groutです。大抵はタイルの接着剤がTinkers Construct MODでレンガに変身です。造り方は砂少々、砂利追加、後は粘土玉を混ぜて出来あがり。これを更に焼くと焦げレンガSearedBrickに成り四個積めば焦げレンガ同盟Seared Bricksが出来上がります。工房はこのお焦げちゃんたちをグラスと組み合わせて箱式五右衛門風呂を造ること。実際に入ったらいい具合に焼け上がります。
風呂に必要な部品ですが調整室Controller、ボイラ竈Tank、排水溝ならん俳鉱溝Drain、と籠BasinとテーブルCasting Tableです。3x3の焦げレンガちゃん’sSeared Bricksを地面に置いて一段上がったブロックで5x5の壁を作っていきます。ControllerとTankは隣合わせで設置が必要ですが後の部品は大抵適当に置いて風呂の形になる様に焦げちゃんと焦げガラスで埋めていきます。排鉱溝Drainには受け止める台TableかBasinを置きましょう。Drainを二つ設けるとインゴットもブロックも簡単簡単。後一言メモとして四角い風呂ですが実際には角の要らない風呂だったりします。寧ろ角ブロックが無いほうが後々便利でした。ブロックが足りなくて造るのが面倒だった訳ではありません。ハイ。
で、このBasinですが鉱石ブロック作りとクリアー・グラスClearGlassを作るのが主な役割です。Clear Glassとは普通のガラスと違って何の亀裂も曇りも無い皇かなガラスのことです。このガラスは壊しても破壊されず再利用できる便利なガラスです。普通なガラスより損の無い代物です。
又、Casting Tableを利用すれば道具の部品を作って様々に組み合わせた道具が作れるようになります。 部品を作る為の型も作れます。あとインゴットも作れます。インゴットを作るには台の上にインゴットを乗せてAluminum Brassをインゴットの上に・・・・・・・
で、此処でやっと気付いたのです。インゴット要るじゃんって。で考えて見たんです。どうやってインゴット造るんだ!!!で、結局 竈でインゴット造れる事に思い至り、工房は未だ暫く放置しようという方針に成りました。
さぁー!取り掛かるぞ!自動式初挑戦。
Monday, May 12, 2014
AND...WE'RE BUILDING IT!
No, not the mob tower. I just finished off the old manual cobblestone/gravel generator. What were you thinking!? If I were to build a mob tower with this set-up, I'd need a lot more time to gather the mats needed to build it because a mob tower takes a lot of mats to build, whether it be cobble, wood or even snow. NO, no. I am in no way ready to build a mob tower - even my type of simple, mostly idiot-proof mob tower. Especially my idiot-proof mob tower because I waste a lot of mats unnecessarily. However, it's really, really helpful if you have an aversion to heights to build it this way because having to be up high and counting out blocks at the same time can often be an extremely trying ordeal.
So, first off, I needed some help in gathering more building mat, cobblestone and/or wood, efficiently and as effortlessly as possible. Efficiently meant that this little helper was going to be easy to build without requiring a lot of resource to keep the production of new material up. After all, I just started the skyblock and I don't have a lot of work with right now. Effortlessly meant I needed something that could generate the mats by itself because my attention was currently going to be occupied by the gathering of other materials that this little helper was not going to be making.
And with this in mind, I visited the FTB wiki (here) and searched for Agrarian Skies. Which resulted in a list of mods used in Agrarian Skies that I could look up. Why not just look it up in game using NEI, you're thinking? It's because I was unfamiliar with most of the mods in this pack and it was easiest
when I actually had the mod list open in one window to look at and the game
running at the same time. Then I could open my inventory, type in @mod.modname to get a list of items that were available in that mod and look up the things that interested me.
Going down the mod list, I find several mods with machines which might be useful in making life easier up here in the skies. And I'm all for easy. But there was one in particular that I really wanted to know how to build - and I already knew what I wanted. I wanted a machine that made me cobblestones all by its lovely self so I could concentrate on getting gravel from my old generator. And I know it's in one of these packs. I just couldn't for the life of me remember what it was called or what mod it was from. ( >.<). Hence the search.
Applied Energistics, I'm not trying to be a rocket scientist here. Bibliocraft, no, not into home decorating yet - though those shelves do look nice. Big Reactors and Blood Magic, spooky stuff can come back around Halloween - I might be ready for you then. Chickens and Codes.......sigh. Exs I'm already over you. Extra Utilities!!!!!! But you don't have it either. I am coming back to you though <3 And so on and so forth, I went until I hit THERMAL EXPANSION 3. Wouldn't you know it? I should have started at the other end. But the effort was not wasted as I did find some other interesting items that might be useful in making life easier and best to put in some effort early on so you can cruise later on, as I like to say.
Anywayz, in Thermal Expansion (TE) I found the miracle machine I wanted. Well, I found a lot of other stuff as well along the way but really at this point for faster progression (or as fast as I can go) I really, really wanted the IGNEOUS EXTRUDER.(Why do they have to have these fancy names for these machines? Makes it so hard to remember what it's called q.q) Not only does it make infinite cobblestone on just 4 buckets of water and 4 buckets of lava, it can make smooth stone and obsidian - these two will consume the water and lava though so remember to refill the tanks if you haven't put in your piping yet.
 |
| Self Contained Units - all machines should be like this |
So what does one need to build an Igneous Extruder in Agrarian Skies? To make an Ingenouse Extruder (practice makes perfect, repetition makes you remember), you need this. >>>
1 piston, check. 2 glass, check.
2 tin, check. A machine frame, not yet. A pnuematic servo, what's that?
So, lets look up a machine frame and a pnuematic servo. Needs 2 iron, 2 glass, 1 redstone for one and 4 glass, 4 iron and 1 gold for the other.
In total making one of these would require:
In total making one of these would require:
3 wood planks
4 cobblestones
1+1 redstone
1+2+4iron ingot
2+2+4 glass
2 tin ingots
1 gold ingot
And then looking at the ingredients, you finally realize. You can't make the automatic cobble generator yet. You don't have any ingots. You only have broken, crushed and pulverized ores.........sigh. What, you didn't really think we were going to be able to make the generator today, did you? You know better than that......first, we'll go make our smeltery (well, you could melt the ores in your furnace and proceed but that would be so normal and simple - not something that would occur to us until we finish doing everything the harder way first. It's not like we forgot we could smelt ore blocks in a furnace too......)
P.S.: I hope everyone had a Happy Mother's Day!
良い母の日を
お過ごしになられたでしょうか?自分は珍しく母と良い一日を過ごせました。ほぼ寝て過ごしてくれました。徘徊無しで。ささやかながらのお祝いも喜んで戴けましたので良い一日でした。
で、本題に戻りまして。
モブタワーです!駄目です!ハイ。
毎回ながら未だ駄目でした。先ず木材、石材、雪材、成りタワーを造るモノが未だに揃っていません。丸石製造機は出来ましたがこれだと先が長いのです。唯で際長い自分の道程が更に長く成るのです。延々と石集めに来る日も来る日も石石井氏です。其処で今回MODを導入してのプレイしているので折角だからお役立ち機材を探そうと思い立ちました。石集めって面倒だしな~
 |
| 注意するのは右側です |
そこでNEI(Not Enough Items)MODを使う為、先ずはインベントリを開けゴマです。で、右側に見える数々のアイテムを一々調べ・・・・たくないですよね?ページ数だけで116です。アイテム数じゃなくページ数です。なので、先ずFTBのウィキィを調べる事から始めました。 こちらです。 因みにウィキィで役に立ちそうなMODを調べて、NEIに@mod.modname (modnameにはMODの名前を打ち込みます。)と打ち込めばそのMODで使用出来るアイテムだけが見れます。それを更にウィキィで調べていくお勉強会でした。
で、MOD数も半端ないです。先頭からザッと目を通してあれでもない、これでもない。アッッでもこれは欲しい、それも欲しい。と迷いながらやっと探し当てた例のモノ。幻の機材。楽々スカイブロックに先ず必要なお助け君、又の名はIgneous Extruderでした。Thermal Expansion MODからです。で、何ですかこのIngeous Extruder略してIEくん?IEくん又の名は自動丸石製造機です。ハイ。
自動なのです。 作って設置したら最後。何もしなくても丸石を次から次からと製造してくれるんです。楽々第一夫人です。最高なパートナーです。一緒放したくない相棒です。水と溶岩を一度与えれば際限無く丸石を作ってはチェストに収めてくれます。又、水と溶岩を消費しても構わない場合Smooth StoneもObsidianも造ってくれます。ダイヤピック必要無しにです。ダイヤ持ち腐れに慣れます。
で、ですね?このお助け君を作るにはですね色々と必要になるんですよ。ピストン一式。ガラス2個。Tinインゴット2個。Machine Frame マシン・フレームとpnuematic servo ニュマチック・サルボーとかも。 最後の2個はThermal Expansionで良く使われる機械部品だったりしますので余分に作ってもいいモノだったりします。で、Machine Frameに必要なのは鉄4個、金1個とガラス4個とpnuematic servoに必要なのは鉄2個、ガラス2個とレッド・ストン1個だったりします。
全て合わせると以下に
3 板
4 丸石
1+1 レッド・ストン
1+2+4 鉄インゴット
2+2+4 ガラス
2 tin インゴット
1 金 インゴット
インゴット・・・・多いですね?初期段階でかなり多いですね?手持ちに無いですよね。タワー駄目ですよね?インゴット大量生産必要ですよね?これからの時代矢張り工房ですよね?タワー遠ざかりますよね?ね?ネ!?念!!
と言う訳で次回工房設置に取り掛かる・・・かもです。
イエイエ、けして鉱石をブロックに固めて竈で焼けばインゴットが作れることを忘れていた訳ではないですよ。ハイ。
Subscribe to:
Comments (Atom)