想いますが当分更新ダメかもです。何故なら謎の洪水が起こってしまいました。
ええ、謎なのです。一寸お昼寝時間を取ってからお片付けをして御休みなさいをしようと思ったのですが。昼寝から起きたら、床が何故か水波波。え?っと思って慌てて風呂場に駆け付ければ何故か蛇口の水が出しっぱなし。・・・・・・・シクシクです。
三時間四時間程水をバケツに、床掃除でした。寝れたのが朝の三時過ぎ。明日仕事。でもって絨毯敷いていたりするので未だ水ピチャピチャ。当分後片付けに追われそうです。
でも、大掃除も出来て良いかも。
と思うことにします。
ハイ。
という訳でその内あるかもないかもです。
So, I had a flood for some reason. Woke up after a power nap and my bedroom floor was wet. Really wet. Like an inch or so of water, wet.
Ran to the bathroom and for some reason, the water faucet was running in the tub. Overflowing, you might say.
Took about 3 or 4 hours before I could get rid of most of the water. Got to bed at 3 a.m. and went to work. The carpeted areas are still soaking. Thinking about cutting them out - after I get a new pair of scissors. Maybe a stronger one this time that won't break?
So, I'm cleaning up the house. For a while.
At least I should have a clean house at the end of this. SO, maybe I'll be back after this is all over. Maybe not. Maybe I'll be on another pack by then. Or maybe not. Who knows......
And the reason for the flooding? Snores away peacefully, without a clue on what's going on...........
Friday, September 19, 2014
Tuesday, September 16, 2014
I forgot.....
about my blog. What a hetare, I am. Boohoo. Shikushiku.
Hah. What? Not like anyone is waiting for the pnuepnuecraft thing, right? Right? *looks away*
Anywayz, Pnuematic craft. It's becoming rather popular nowdays, or maybe unpopular would be a better word for it? Because it's so Bah, humbug. But onward and upward we must go if we're to complete our Crash Landing quests and progress into a life of leisure via automation. Besides, a smoothie or two would be nice, no?
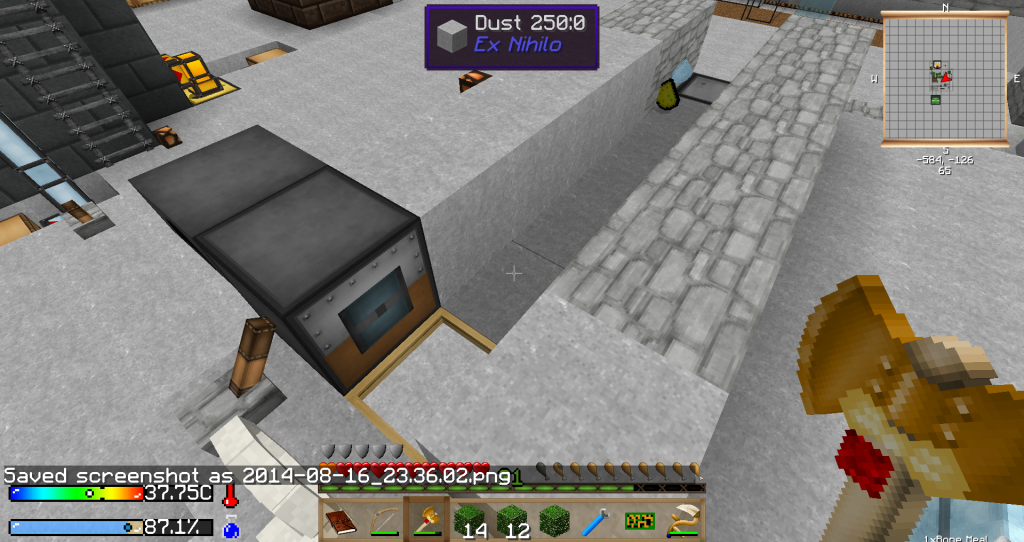
So, to begin our quest into pnuecraft, we begin by making some TNT. Because the quest requires us to. Then I like to put it in a frame - if I have the leather to spare cuz really, you think I'm going to use a TNT to make compressed iron? Me, Ms. Clutzy? Ms. Hetare? Uh, no. I can be my worst enemy and I know it. So up goes the frame and we make instead the baby TNT aka Tiny TNT from the Applied Energistic mod because it works just as well and doesn't cause as much of a destruction as a regular TNT explosion would. But just to be safe, as causing an explosion in your base and having your walls come tumbling down would be a bad idea, I like to make a small detonation chamber. Nothing fancy, just a box with compressed cobblestone walls around it. All you do is set the tnt, toss in some iron, flip a lever and run away. Just in case. Come back after the explosion, and wallah, your newly formed compressed iron is made. Unfortunately, when you make compressed iron in this manner, it means you need to prepare for some losses because explosions will do that to you. It makes you lose some of your iron. So if you need a stack, best make two to be sure. And you will need a lot of the compressed iron - if you're playing 1.1, which I was in this playthrough. 1.2 however, lets you steal the necessary components of the mod from the abandoned city so you may not have to do this if you go city raiding.
In any case, after wasting some iron, and having some fun blowing things up, we now should have a stack or two, or three, but hopefully at least four stacks of compressed iron. Yes, I know it's a lot but I like to do the dangerous stuff while I still remember that it's dangerous so doing it all at once is a good thing. This way I won't have to risk coming back to this later if I should run short. And this lets me get it out of my system, the need to blow things up. Crazy, as it sounds, I rather like doing it sometimes. Worries me...sometimes.
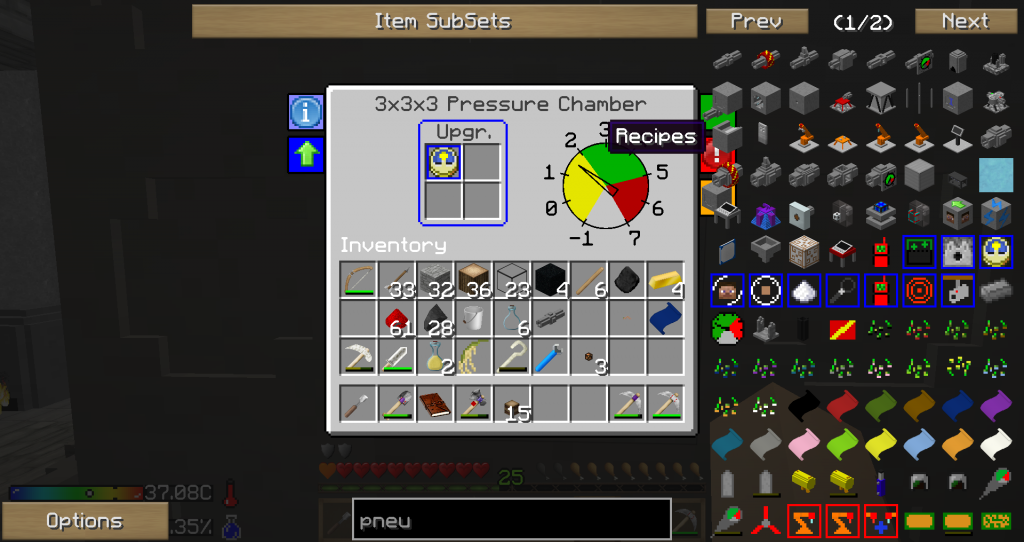
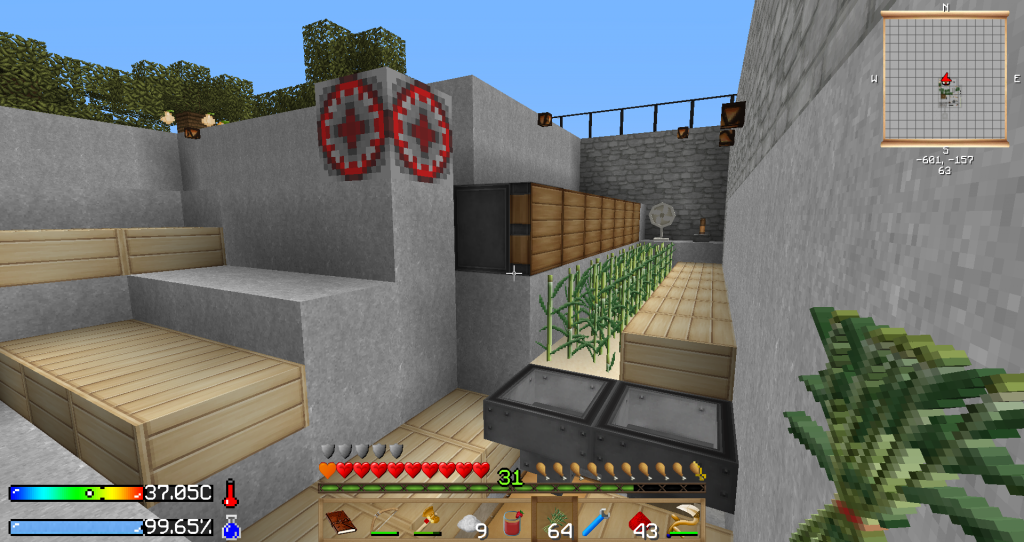
At any rate, the reason we need so much of this compressed iron is because we need to build a multi-block structure so we won't ever have to play with the tnt again - if all goes well. The pressure chamber - built in a 3 x 3 cube made of, you guessed it, compressed iron. It consists of mostly chamber walls which are made of 4 compressed iron. You can also throw in a chamber window so you can see when your items are done. And chamber valve so you can supply it with pressure via the air compressors. So to make a pressure chamber, you'll need at least 1 chamber valve, 25 chamber wall and at least 1 chamber window. The number of walls and windows can change - if you use more windows to look into the chamber as it is working you'll need less walls. I normally like having at least 3 windows to look in on the process. Cheap entertainment.
Anywayz, once you select your site, you lay down your chamber walls in a 3 x 3 grid. Think smelter layout. After this, we leave the middle section open and put in 4 walls in the corner of the 2nd layer. Put in the valve in any one of the open block spaces between the wall blocks. Then fill in the rest of the open spaces with either windows or walls - remember LEAVE THE MIDDLE SECTION OPEN. Now do another 3 x 3 grid on top with walls. This completes your pressure chamber - by the way, it really doesn't seem to matter which way to blocks face - unless it bothers your OCD. Though if you put the windows in the wrong way, you wont' be able to see what's going on inside so I guess you might want to watch out how you place the windows?
Now when you first start doing this, you might not have made the Chamber Interfaces yet. In this case, you'll have to break some blocks to access the items you put into the pressure chamber. If you did though find some or have some laying around, you can put them in one of the sides that face the chamber - in my case I put them on the top and bottom of the chamber. I also attach a chest and
hopper on the top and bottom to put in and pull out items from the chamber so I no longer have to break the chamber open. The Chamber Interfaces do have a right-wrong side so be sure to put these blocks in facing the correct way. I is for in and O is for out might be an easy way to remember if you can't quite remember the color difference of orange and blue. And if all else fails, put it in and break it out later if it's facing the wrong way you'll know because it won't pull or put in the items as you want from the chests.
Now, to power your chamber we need some air compressors. One is fine, though two might be faster. Three is overkill though if you feel the need I suppose you have the iron to waste so go for it. A block of coal/charcoal is normally enough to power up the chamber to the appropriate pressure for most items you'll want to make in the chamber. Get some pipes and run them over to the pressure valve so it can pump in the air to pressurize the chamber. You might want to attach a pressure gauge to one of the pipes at this time so you can keep an eye on how much pressure it running through your system. Because if you run it and it goes over the capacity of the system it will explode. And you'll lose a few pipes and parts, if you're lucky. I'm lucky it normally happens to me when I go away to do something else.
Of course, you could prevent this if you ran some redstone from the gauge to your compressors to turn them off when they receive a low redstone signal that matches the blowing point of the pipes. Or if you ran them to the safety valves even, so it would release pressure from the system when it reached a certain signal strength. But as we know my math skills and redstone skills are vastly lacking, we'll just keep letting them explode. Has nothing to do with the fact that I don't have the room to run enough redstone through to do it. Nope, nothing at all to do with the fact that I'd have to widen the room more to do this correctly. I just can't do the math right.
At any rate, with this, we finally have a somewhat functional pressure chamber so we don't have to constantly play with tnt. Because now all we do is build pressure in the pressure chamber, and throw the iron in before sealing it off until it converts into compressed iron. This also lets us create other items that we can't with just playing with tnt. Things that we need to modernize like the machine frame/block. And finally, it might also be a good idea to get a life upgrade so when you do leave the items in the chamber they won't decompose and disappear before you remember you left them there an hour ago.
Hah. What? Not like anyone is waiting for the pnuepnuecraft thing, right? Right? *looks away*
Anywayz, Pnuematic craft. It's becoming rather popular nowdays, or maybe unpopular would be a better word for it? Because it's so Bah, humbug. But onward and upward we must go if we're to complete our Crash Landing quests and progress into a life of leisure via automation. Besides, a smoothie or two would be nice, no?
 |
| Hetare = more work |
In any case, after wasting some iron, and having some fun blowing things up, we now should have a stack or two, or three, but hopefully at least four stacks of compressed iron. Yes, I know it's a lot but I like to do the dangerous stuff while I still remember that it's dangerous so doing it all at once is a good thing. This way I won't have to risk coming back to this later if I should run short. And this lets me get it out of my system, the need to blow things up. Crazy, as it sounds, I rather like doing it sometimes. Worries me...sometimes.
At any rate, the reason we need so much of this compressed iron is because we need to build a multi-block structure so we won't ever have to play with the tnt again - if all goes well. The pressure chamber - built in a 3 x 3 cube made of, you guessed it, compressed iron. It consists of mostly chamber walls which are made of 4 compressed iron. You can also throw in a chamber window so you can see when your items are done. And chamber valve so you can supply it with pressure via the air compressors. So to make a pressure chamber, you'll need at least 1 chamber valve, 25 chamber wall and at least 1 chamber window. The number of walls and windows can change - if you use more windows to look into the chamber as it is working you'll need less walls. I normally like having at least 3 windows to look in on the process. Cheap entertainment.
Anywayz, once you select your site, you lay down your chamber walls in a 3 x 3 grid. Think smelter layout. After this, we leave the middle section open and put in 4 walls in the corner of the 2nd layer. Put in the valve in any one of the open block spaces between the wall blocks. Then fill in the rest of the open spaces with either windows or walls - remember LEAVE THE MIDDLE SECTION OPEN. Now do another 3 x 3 grid on top with walls. This completes your pressure chamber - by the way, it really doesn't seem to matter which way to blocks face - unless it bothers your OCD. Though if you put the windows in the wrong way, you wont' be able to see what's going on inside so I guess you might want to watch out how you place the windows?
Now when you first start doing this, you might not have made the Chamber Interfaces yet. In this case, you'll have to break some blocks to access the items you put into the pressure chamber. If you did though find some or have some laying around, you can put them in one of the sides that face the chamber - in my case I put them on the top and bottom of the chamber. I also attach a chest and
 |
| Connect to the MIDDLE block - won't work any place else. |
Now, to power your chamber we need some air compressors. One is fine, though two might be faster. Three is overkill though if you feel the need I suppose you have the iron to waste so go for it. A block of coal/charcoal is normally enough to power up the chamber to the appropriate pressure for most items you'll want to make in the chamber. Get some pipes and run them over to the pressure valve so it can pump in the air to pressurize the chamber. You might want to attach a pressure gauge to one of the pipes at this time so you can keep an eye on how much pressure it running through your system. Because if you run it and it goes over the capacity of the system it will explode. And you'll lose a few pipes and parts, if you're lucky. I'm lucky it normally happens to me when I go away to do something else.
Of course, you could prevent this if you ran some redstone from the gauge to your compressors to turn them off when they receive a low redstone signal that matches the blowing point of the pipes. Or if you ran them to the safety valves even, so it would release pressure from the system when it reached a certain signal strength. But as we know my math skills and redstone skills are vastly lacking, we'll just keep letting them explode. Has nothing to do with the fact that I don't have the room to run enough redstone through to do it. Nope, nothing at all to do with the fact that I'd have to widen the room more to do this correctly. I just can't do the math right.
At any rate, with this, we finally have a somewhat functional pressure chamber so we don't have to constantly play with tnt. Because now all we do is build pressure in the pressure chamber, and throw the iron in before sealing it off until it converts into compressed iron. This also lets us create other items that we can't with just playing with tnt. Things that we need to modernize like the machine frame/block. And finally, it might also be a good idea to get a life upgrade so when you do leave the items in the chamber they won't decompose and disappear before you remember you left them there an hour ago.
 |
| Set it and forget it. |
日本語編後日改めてです。
Monday, September 8, 2014
もう少しで
CrashLandingに必要なモッドに付いての説明も終わりそうです。ヌメヌメクラフト(実名はPneumaticCraft)をザットお浚いするだけです。では、早速始めたいと思いますがその前に基地を整えます。色々と場所、材料、と時間を確保しなければ逝けない免毒さ・・・・ややこしいモッドです。言い直しても悪口になるモッドです。実際はそれなりに便利だし使い易いモッド・・・・・なのかもしれません。個人感覚による所が大きいと思います。遣れば遣るほど馴染み悪くないかもって錯覚を起こす様に成りました。毒されています。
で、英語で説明する際基地造りの順が反対になっていたので本日の説明はキチンと壁からという訳です。大体ベッドが確保出来るようになると先ず丸石製造機を作ります。基本です。AgrarianSkiesでお馴染みな物を作ります。これにAutonomous Activatorを設置します。クエストで貰えますのでこのクエストコンプを一刻も早く済ませることをお勧めします。で、ですね?此処で覚えておくことは丸石製造機には丸石と砂利が作れると言うことです。Ver1.2では重要になるかもです。
何故重要かと言うと丸石を取るには鶴嘴PickaxeをAutonomous Activatorに設置しないと逝けないからです。これをTiConの鶴嘴ですると勝手にレベルアップをしてくれます。便利です。丸石も壁作りに使えて、レブルアップもしてくれる便利性。お負けにハンマを一緒に入れておくと砂利も出て来ます。この砂利をザルに掛けてダイヤ装備を整えると暑さ寒さ耐性も出て来ます。ダイヤ装備は金属製装備と違い暑さ寒さにさほど左右されません。Diamonds are a girl's best friendとはイイモノです(Youtube検索<3)。色んな意味で。
で、話がいつもの様にそれました。丸石で壁作りを行いましょう。で、その後かなりの広場になった基地です。片隅に草畑を設置。此方では草刈りの他木狩りも行います。初期段階では技術が追いつかないので手で狩りますがその為に上がり上りの効く階段と8ブロック位の高さにガラス足場を組み立てて刈りやすいようにします。飛び降りては樹の枝に止まり刈刈刈。仕事人になった気分です。で、仕事序に草刈りも行います。Mattockを使ってクリックすると草が刈れて偶に食物の種も飛び出てきます。草は必ず一ブロック残しておくこともお忘れなく。そこから草が生えかえります。で、WateringCanを使うと草がドンドン生えかえりますので創ることをお勧めします。注意する点はWateringCanの種類は2つ在ることですが一種類しか造れないってことでしょうか?こっちが造れなかったあっちを作ろうです。
で草を刈ったり骨粉かけて又刈ったりします(処で草をそのまま刈るのと骨粉をかけて苅るのとでは種の種類に違いが有りますので両方する事をお勧めします)とかなりの数の種が取れますので専門の畑を作りましょう。畑を耕すには水がないとダメです。逆に草を刈る時は無い方が良いんです。で、水ですが貴重品です。なので畑を一ブロックの水だけで耕すことをお勧めします。個人的にこぢんまりとした感じが良いので9x9の畑を作ります。水の流れは下に無限に落ちますので次の畑も今の畑の真下に作って行くと水は一ブロックで済みます。専門畑を作るのも良かったりしました。PeanutButter&Jellyシリーズをフルーツ畑、ピーナツと米畑。 砂糖キビは他で作っていました。で、お負けですが畑を重ねたらイカも珠に沸きます。イカ畑です。
 で、身の安全を壁で図り、畑らで水と食べ物の安全も図れましたので今度は材料の増幅を図ります。つまりふるいを自動化してしまいましょう。此方ではAutonomousActivatorが一個しかないのですがこの一個を今丸石製造機から外します。一応砂利がJabba一個分位になってからのお話です。大抵は壁作りが終わる頃には一杯一杯です。無くても大丈夫です。最初に言っておきます。この方法は面白かったのでこうやっているだけです。効率が良いとは嘘でも言えません。でも可愛いなと想いましたので敢えてしていました。
百聞は一見にしかずなので実際に自動化されている現場はこうだったりします。AutonomousActivatorを設置します。隣にレバー。又その隣にFan(Open Block)を置き、ザルをその前に設置。で、この侭オンにするとザルからの物があっちこっちに飛んでいきます。ので、真っ直ぐ走るための舗装路ならん壁を敷いて堕ちる先にはhopperとチェスト。で、チェストからNodeでJabbaに運ぶとこうなったりしました。滅茶苦茶便利なものですNodeって。自分で勝手に整理されてくれたりします。でも、この方法(ザルの自動化の事で在ってNode整理のことではないです)本当にこのマップでは遊びの為のものです。何故ってこのModPackには神様Modが入っているからです。Steve's Factory Managerでもっと効率が良い遣り方が幾らでもあったりします。Youtubeで検索なさるのも良いと思います。親切なことにMod製作者さんザルの自動化の説明会を初期段階と上級者段階に分けてアップしてくれています。態々このパックに合わせて。有難う御座いますな瞬間でした。でもVer1.1では使いませんでした。必要なかったので。Ver1.2では初期段階を使っています。便利すぎて処理が追い付かなくなるので。
で、この様に色々と基地を整理してヌメヌメクラフトに入れる様にして行かないと逝けなかったVer1.1でした。 Ver1.2では廃墟に逝ってかっぱらってくれば良いだけです。未だに逝っていません。怖くて。
さて、更新ですが馬鹿みたいに忙しい時期が時々訪れてしまい家に帰ってはバッタンキュン。ブロッグ書く前にバッタンキュウ。なので寝る事を優先しています。御休み。
で、英語で説明する際基地造りの順が反対になっていたので本日の説明はキチンと壁からという訳です。大体ベッドが確保出来るようになると先ず丸石製造機を作ります。基本です。AgrarianSkiesでお馴染みな物を作ります。これにAutonomous Activatorを設置します。クエストで貰えますのでこのクエストコンプを一刻も早く済ませることをお勧めします。で、ですね?此処で覚えておくことは丸石製造機には丸石と砂利が作れると言うことです。Ver1.2では重要になるかもです。
何故重要かと言うと丸石を取るには鶴嘴PickaxeをAutonomous Activatorに設置しないと逝けないからです。これをTiConの鶴嘴ですると勝手にレベルアップをしてくれます。便利です。丸石も壁作りに使えて、レブルアップもしてくれる便利性。お負けにハンマを一緒に入れておくと砂利も出て来ます。この砂利をザルに掛けてダイヤ装備を整えると暑さ寒さ耐性も出て来ます。ダイヤ装備は金属製装備と違い暑さ寒さにさほど左右されません。Diamonds are a girl's best friendとはイイモノです(Youtube検索<3)。色んな意味で。
で、話がいつもの様にそれました。丸石で壁作りを行いましょう。で、その後かなりの広場になった基地です。片隅に草畑を設置。此方では草刈りの他木狩りも行います。初期段階では技術が追いつかないので手で狩りますがその為に上がり上りの効く階段と8ブロック位の高さにガラス足場を組み立てて刈りやすいようにします。飛び降りては樹の枝に止まり刈刈刈。仕事人になった気分です。で、仕事序に草刈りも行います。Mattockを使ってクリックすると草が刈れて偶に食物の種も飛び出てきます。草は必ず一ブロック残しておくこともお忘れなく。そこから草が生えかえります。で、WateringCanを使うと草がドンドン生えかえりますので創ることをお勧めします。注意する点はWateringCanの種類は2つ在ることですが一種類しか造れないってことでしょうか?こっちが造れなかったあっちを作ろうです。
 |
| 考えても無駄だったので扇風機、ピストンとレッドストーンクロックです。 |
 で、身の安全を壁で図り、畑らで水と食べ物の安全も図れましたので今度は材料の増幅を図ります。つまりふるいを自動化してしまいましょう。此方ではAutonomousActivatorが一個しかないのですがこの一個を今丸石製造機から外します。一応砂利がJabba一個分位になってからのお話です。大抵は壁作りが終わる頃には一杯一杯です。無くても大丈夫です。最初に言っておきます。この方法は面白かったのでこうやっているだけです。効率が良いとは嘘でも言えません。でも可愛いなと想いましたので敢えてしていました。
 |
| 片付けが下手なので便利です |
で、この様に色々と基地を整理してヌメヌメクラフトに入れる様にして行かないと逝けなかったVer1.1でした。 Ver1.2では廃墟に逝ってかっぱらってくれば良いだけです。未だに逝っていません。怖くて。
さて、更新ですが馬鹿みたいに忙しい時期が時々訪れてしまい家に帰ってはバッタンキュン。ブロッグ書く前にバッタンキュウ。なので寝る事を優先しています。御休み。
Subscribe to:
Comments (Atom)